Netgear AX3600 User Manual - Page 61
Use the WPS Wizard for WiFi connections
 |
View all Netgear AX3600 manuals
Add to My Manuals
Save this manual to your list of manuals |
Page 61 highlights
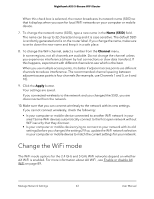
Nighthawk AX5 5-Stream WiFi Router The user name is admin. The password is the one that you specified the first time that you logged in. The user name and password are case-sensitive. The BASIC Home page displays. 4. Select ADVANCED > Setup > LAN Setup. The LAN Setup page displays. 5. Select the radio button next to the reserved address that you want to delete. 6. Click the Delete button. The address is removed. Use the WPS Wizard for WiFi connections The WPS Wizard helps you connect WPS-enabled devices to your WiFi network without typing the WiFi password. You can use the WPS Wizard or you can use the physical WPS button on your router to connect WPS-enabled devices. To use the physical WPS button on your router, see Connect to the WiFi network using WPS on page 18 for more information. To use the WPS Wizard to connect to the WiFi network: 1. Launch a web browser from a computer or mobile device that is connected to the router network. 2. Enter http://www.routerlogin.net. A login window opens. 3. Enter the router admin user name and password. The user name is admin. The password is the one that you specified the first time that you logged in. The user name and password are case-sensitive. The BASIC Home page displays. 4. Select ADVANCED > WPS Wizard. The Add WPS Client page displays. 5. Click the Next button. The page displays instructions about how to connect using WPS. 6. Click the WPS button that displays on the page. Note: To use the physical WPS push button on the router, see Connect to the WiFi network using WPS on page 18 and follow the instructions in that section. Manage Network Settings 61 User Manual
-
 1
1 -
2
-
3
-
4
-
5
-
6
-
7
-
8
-
9
-
10
-
11
-
12
-
13
-
14
-
15
-
16
-
17
-
18
-
19
-
20
-
21
-
22
-
23
-
24
-
25
-
26
-
27
-
28
-
29
-
30
-
31
-
32
-
33
-
34
-
35
-
36
-
37
-
38
-
39
-
40
-
41
-
42
-
43
-
44
-
45
-
46
-
47
-
48
-
49
-
50
-
51
-
52
-
53
-
54
-
55
-
 56
56 -
 57
57 -
 58
58 -
 59
59 -
 60
60 -
 61
61 -
 62
62 -
 63
63 -
 64
64 -
 65
65 -
 66
66 -
67
-
68
-
69
-
70
-
71
-
72
-
73
-
74
-
75
-
76
-
77
-
78
-
79
-
80
-
81
-
82
-
83
-
84
-
85
-
86
-
87
-
88
-
89
-
90
-
91
-
92
-
93
-
94
-
95
-
96
-
97
-
98
-
99
-
100
-
101
-
102
-
103
-
104
-
105
-
106
-
107
-
108
-
109
-
110
-
111
-
112
-
113
-
114
-
115
-
116
-
117
-
118
-
119
-
120
-
121
-
122
-
123
-
124
-
125
-
126
-
127
-
128
-
129
-
130
-
131
-
132
-
133
-
134
-
135
-
136
-
137
-
138
-
139
-
140
-
141
-
142
-
143
-
144
-
145
-
146
-
147
-
148
-
149
-
150
-
151
-
152
-
153
-
154
-
155
-
156
-
157
-
158
-
159
-
160
-
161
 |
 |
