Netgear FS108P Configuring for Avaya IP Telephones - Page 17
Verification Steps - switch
 |
UPC - 606449037814
View all Netgear FS108P manuals
Add to My Manuals
Save this manual to your list of manuals |
Page 17 highlights
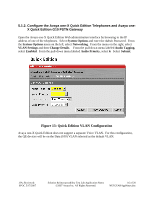
6. Verification Steps Backup the FS726TP configuration before beginning any of these steps. 6.1. Verification Steps for Avaya IP Telephones and Avaya Communications Manager Place phone calls between each of the Avaya IP Telephones powered by the NETGEAR switches and trunk lines on Avaya Communication Manager. Verify that the audio quality is acceptable. This will verify the voice network is correctly connected. Use the Network Options on the telephone to verify that the audio statistics. Packet Loss should be 0%. Packetization Delay should be consistent with the Codec Set selected on the Avaya Communications Manager. One-way Network Delay and Network Jitter Delay will be dependent on the configuration beyond the NETGEAR switches. Plug a PC into the PC port of each of the Avaya IP Telephones and browse to an enterprise web site. This will verify that the Data network is correctly connected. Power cycle the NETGEAR switch. When power returns, the Avaya IP Telephones should power up, download the parameters from the corporate DHCP/TFTP/HTTP servers and register with Avaya Communications Manager. Repeat the above steps in the above three paragraphs to verify that the NETGEAR switch retained the working configuration. 6.2. Verification Steps for Avaya one-X Quick Edition Telephones and Avaya one-X G10 PSTN Gateway Place a phone call between an Avaya one-X Quick Edition telephone and an Avaya one-X Quick Edition G10 Gateway port to the PSTN. Verify that the audio quality is acceptable. Power cycle the NETGEAR switch. Verify that all of the Avaya one-X Quick Edition telephone and an Avaya one-X Quick Edition G10 Gateway power up and discover each other. Place phone calls to verify the Avaya one-X Quick Edition telephone and an Avaya one-X Quick Edition G10 Gateway are operational. Plug a PC into the PC port of one of the QE telephones and browse the web address of one of the Avaya one-X Quick Edition telephones. Follow the steps in Section 4.2.1 to verify that the VLAN settings have been retained. JJA; Reviewed: SPOC 5/17/2007 Solution & Interoperability Test Lab Application Notes ©2007 Avaya Inc. All Rights Reserved. 17 of 20 NETGEARAppNotes.doc
-
 1
1 -
2
-
3
-
4
-
5
-
6
-
7
-
8
-
9
-
10
-
11
-
 12
12 -
 13
13 -
 14
14 -
 15
15 -
 16
16 -
 17
17 -
 18
18 -
 19
19 -
 20
20
 |
 |