Netgear GS108E ProSafe Plus Switches Configuration Utility User Guide - Page 35
Rate Limiting, Broadcast Filtering, 1p Based, To con rate limiting, System, QoS > Rate Limit
 |
View all Netgear GS108E manuals
Add to My Manuals
Save this manual to your list of manuals |
Page 35 highlights
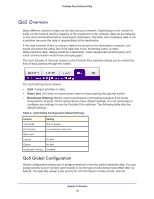
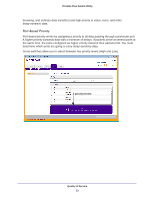
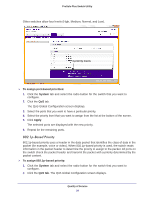
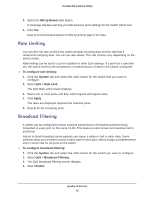
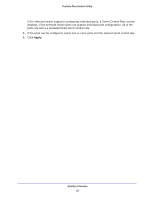
ProSafe Plus Switch Utility 3. Select the 802.1p Based radio button. A message displays warning you that previous QoS settings for the switch will be lost. 4. Click Yes. Data is now processed based on 802.1p priority tags in the data. Rate Limiting You can limit the rate at which the switch accepts incoming data and the rate that it retransmits outgoing data. You can set rate values. The rate choices vary depending on the switch model. Rate limiting can be set for a port in addition to other QoS settings. If a port has a rate limit set, the switch restricts the acceptance or retransmission of data to the values configured. To configure rate limiting: 1. Click the System tab and select the radio button for the switch that you want to configure. 2. Select QoS > Rate Limit. The QoS Rate Limit screen displays. 3. Select one or more ports, and then select ingress and egress rates. 4. Click Apply. The rates are displayed opposite the selected ports. 5. Repeat for the remaining ports. Broadcast Filtering A switch can be configured to block massive transmission of broadcast packets being forwarded to every port on the same VLAN. This feature is also known as broadcast storm protection. Failure to block broadcast storm packets can cause a delay or halt to other data. Some switches allow you to select a storm control rate for each port; others assign a predetermined storm control rate for all ports on the switch. To configure broadcast filtering: 1. Click the System tab and select the radio button for the switch you want to configure. 2. Select QoS > Broadcast Filtering. 3. The QoS Broadcast Filtering screen displays. 4. Select Enable. Quality of Service 35
-
 1
1 -
2
-
3
-
4
-
5
-
6
-
7
-
8
-
9
-
10
-
11
-
12
-
13
-
14
-
15
-
16
-
17
-
18
-
19
-
20
-
21
-
22
-
23
-
24
-
25
-
26
-
27
-
28
-
29
-
 30
30 -
 31
31 -
 32
32 -
 33
33 -
 34
34 -
 35
35 -
 36
36 -
 37
37 -
 38
38 -
 39
39 -
 40
40 -
41
-
42
-
43
-
44
 |
 |