Netgear PS121v2 PS121v2 Reference Manual - Page 24
Adding a Printer with Windows Vista, Standard TCP/IP Port, and then click Next.
 |
View all Netgear PS121v2 manuals
Add to My Manuals
Save this manual to your list of manuals |
Page 24 highlights
NETGEAR USB Multifunction Printer Server PS121v2 User Manual Adding a Printer with Windows Vista 1. From the Windows Start menu of a computer connected to the same network as the USB Multifunction Print Server, click Settings then click Printers. 2. Click Add a Printer, select Add a local printer, and then click Next. Figure 2-7 3. Select the Create a new port radio button. From the Type of port drop-down list, select Standard TCP/IP Port, and then click Next. Figure 2-8 2-8 v2.0, April 2007 Installation and Setup
-
 1
1 -
2
-
3
-
4
-
5
-
6
-
7
-
8
-
9
-
10
-
11
-
12
-
13
-
14
-
15
-
16
-
17
-
18
-
 19
19 -
 20
20 -
 21
21 -
 22
22 -
 23
23 -
 24
24 -
 25
25 -
 26
26 -
 27
27 -
 28
28 -
 29
29 -
30
-
31
-
32
-
33
-
34
-
35
-
36
-
37
-
38
-
39
-
40
-
41
-
42
-
43
-
44
-
45
-
46
-
47
-
48
-
49
-
50
-
51
-
52
 |
 |

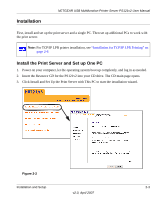
NETGEAR USB Multifunction Printer Server PS121v2 User Manual
2-8
Installation and Setup
v2.0, April 2007
Adding a Printer with Windows Vista
1.
From the Windows Start menu of a computer connected to the same network as the USB
Multifunction Print Server, click Settings then click Printers.
2.
Click Add a Printer, select Add a local printer, and then click Next.
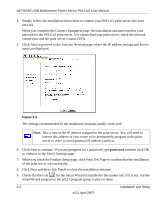
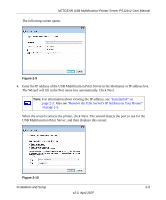
3.
Select the Create a new port radio button. From the Type of port drop-down list, select
Standard TCP/IP Port, and then click Next.
Figure 2-7
Figure 2-8