Netgear WAX204-WiFi User Manual - Page 125
Change the MTU size [router mode
 |
View all Netgear WAX204-WiFi manuals
Add to My Manuals
Save this manual to your list of manuals |
Page 125 highlights
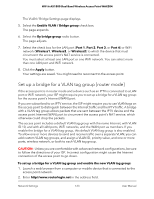
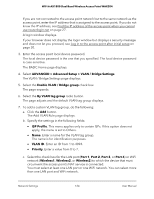
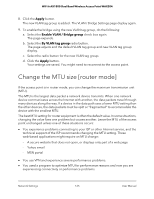
WiFi 6 AX1800 Dual Band Wireless Access Point WAX204 8. Click the Apply button. The new VLAN tag group is added . The VLAN / Bridge Settings page display again. 9. To enable the bridge using the new VLAN tag group, do the following: a. Select the Enable VLAN / Bridge group check box again. The page expands. b. Select the By VLAN tag group radio button. The page adjusts and the default VLAN tag group and new VLAN tag group display. c. Select the radio button for the new VLAN tag group. d. Click the Apply button. Your settings are saved. You might need to reconnect to the access point. Change the MTU size [router mode] If the access point is in router mode, you can change the maximum transmission unit (MTU). The MTU is the largest data packet a network device transmits. When one network device communicates across the Internet with another, the data packets travel through many devices along the way. If a device in the data path uses a lower MTU setting than the other devices, the data packets must be split or "fragmented" to accommodate the device with the smallest MTU. The best MTU setting for router equipment is often the default value. In some situations, changing the value fixes one problem but causes another. Leave the MTU of the access point unchanged unless one of these situations occurs: • You experience problems connecting to your ISP or other Internet service, and the technical support of the ISP recommends changing the MTU setting. These web-based applications might require an MTU change: - A secure website that does not open, or displays only part of a web page - Yahoo email - MSN portal • You use VPN and experience severe performance problems. • You used a program to optimize MTU for performance reasons and now you are experiencing connectivity or performance problems. Network Settings 125 User Manual
-
 1
1 -
2
-
3
-
4
-
5
-
6
-
7
-
8
-
9
-
10
-
11
-
12
-
13
-
14
-
15
-
16
-
17
-
18
-
19
-
20
-
21
-
22
-
23
-
24
-
25
-
26
-
27
-
28
-
29
-
30
-
31
-
32
-
33
-
34
-
35
-
36
-
37
-
38
-
39
-
40
-
41
-
42
-
43
-
44
-
45
-
46
-
47
-
48
-
49
-
50
-
51
-
52
-
53
-
54
-
55
-
56
-
57
-
58
-
59
-
60
-
61
-
62
-
63
-
64
-
65
-
66
-
67
-
68
-
69
-
70
-
71
-
72
-
73
-
74
-
75
-
76
-
77
-
78
-
79
-
80
-
81
-
82
-
83
-
84
-
85
-
86
-
87
-
88
-
89
-
90
-
91
-
92
-
93
-
94
-
95
-
96
-
97
-
98
-
99
-
100
-
101
-
102
-
103
-
104
-
105
-
106
-
107
-
108
-
109
-
110
-
111
-
112
-
113
-
114
-
115
-
116
-
117
-
118
-
119
-
 120
120 -
 121
121 -
 122
122 -
 123
123 -
 124
124 -
 125
125 -
 126
126 -
 127
127 -
 128
128 -
 129
129 -
 130
130 -
131
-
132
-
133
-
134
-
135
-
136
-
137
-
138
-
139
-
140
-
141
-
142
-
143
-
144
-
145
-
146
-
147
-
148
-
149
-
150
-
151
-
152
-
153
-
154
-
155
-
156
-
157
-
158
-
159
-
160
-
161
-
162
-
163
-
164
-
165
-
166
-
167
-
168
-
169
-
170
-
171
-
172
-
173
-
174
-
175
-
176
-
177
-
178
-
179
-
180
-
181
-
182
-
183
-
184
-
185
-
186
-
187
-
188
-
189
-
190
-
191
-
192
-
193
-
194
-
195
-
196
-
197
-
198
-
199
-
200
-
201
-
202
-
203
-
204
-
205
-
206
-
207
-
208
-
209
-
210
-
211
-
212
-
213
-
214
-
215
-
216
-
217
-
218
-
219
-
220
-
221
-
222
-
223
-
224
-
225
-
226
-
227
-
228
-
229
-
230
-
231
-
232
-
233
-
234
-
235
-
236
-
237
-
238
-
239
-
240
-
241
-
242
-
243
-
244
-
245
-
246
 |
 |