Netgear WAX204-WiFi User Manual - Page 23
Connect over WiFi, Connect over Ethernet directly to the access point
 |
View all Netgear WAX204-WiFi manuals
Add to My Manuals
Save this manual to your list of manuals |
Page 23 highlights
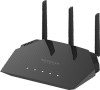
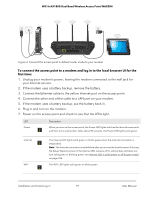
WiFi 6 AX1800 Dual Band Wireless Access Point WAX204 LED Power Internet WiFi Description When you turn on the access point, the Power LED lights solid red for about five seconds and then turns solid amber. After about 90 seconds, the Power LED lights solid green. The Internet LED lights solid green or blinks green when the Internet connection is established. Note: The Internet connection is established after you access the local browser UI during the Setup Wizard process. If the Internet LED remains off or solid amber and does not turn solid green or blinking green, see Internet LED is solid amber or off [access point mode] on page 227. The WiFi LED lights solid green or blinks green. 4. Log in to the access point by using one of the following methods: • Connect over WiFi. On a WiFi-enabled computer or mobile device, find and connect to the access point's WiFi network (SSID). The default SSID and WiFi password (network key) are printed on the access point label. • Connect over Ethernet directly to the access point. Using an Ethernet cable, connect the LAN port on your computer directly to any of the four LANs port on the access point. 5. Launch a web browser and enter http://www.routerlogin.net in the address field. The Setup Wizard starts. If the Setup Wizard does not start, see You cannot log in to the access point [access point mode] on page 229. 6. Follow the prompts. Note the following: • Trouble connecting to the Internet? If the access point does not connect to the Internet, see Troubleshoot Internet browsing on page 234. • WAN connection type. If the WAN connection is PPPoE, L2TP, or PPTP, or your Internet connection requires a static IP address, during the Setup Wizard Process, provide the required information for the Internet connection when the Smart Setup Wizard prompts you for the information. • New admin password. During the Setup Wizard process, you must specify a new admin password (the local device password) and specify answers to two security questions (you can choose the questions). Installation and Initial Log-in 23 User Manual
-
 1
1 -
2
-
3
-
4
-
5
-
6
-
7
-
8
-
9
-
10
-
11
-
12
-
13
-
14
-
15
-
16
-
17
-
 18
18 -
 19
19 -
 20
20 -
 21
21 -
 22
22 -
 23
23 -
 24
24 -
 25
25 -
 26
26 -
 27
27 -
 28
28 -
29
-
30
-
31
-
32
-
33
-
34
-
35
-
36
-
37
-
38
-
39
-
40
-
41
-
42
-
43
-
44
-
45
-
46
-
47
-
48
-
49
-
50
-
51
-
52
-
53
-
54
-
55
-
56
-
57
-
58
-
59
-
60
-
61
-
62
-
63
-
64
-
65
-
66
-
67
-
68
-
69
-
70
-
71
-
72
-
73
-
74
-
75
-
76
-
77
-
78
-
79
-
80
-
81
-
82
-
83
-
84
-
85
-
86
-
87
-
88
-
89
-
90
-
91
-
92
-
93
-
94
-
95
-
96
-
97
-
98
-
99
-
100
-
101
-
102
-
103
-
104
-
105
-
106
-
107
-
108
-
109
-
110
-
111
-
112
-
113
-
114
-
115
-
116
-
117
-
118
-
119
-
120
-
121
-
122
-
123
-
124
-
125
-
126
-
127
-
128
-
129
-
130
-
131
-
132
-
133
-
134
-
135
-
136
-
137
-
138
-
139
-
140
-
141
-
142
-
143
-
144
-
145
-
146
-
147
-
148
-
149
-
150
-
151
-
152
-
153
-
154
-
155
-
156
-
157
-
158
-
159
-
160
-
161
-
162
-
163
-
164
-
165
-
166
-
167
-
168
-
169
-
170
-
171
-
172
-
173
-
174
-
175
-
176
-
177
-
178
-
179
-
180
-
181
-
182
-
183
-
184
-
185
-
186
-
187
-
188
-
189
-
190
-
191
-
192
-
193
-
194
-
195
-
196
-
197
-
198
-
199
-
200
-
201
-
202
-
203
-
204
-
205
-
206
-
207
-
208
-
209
-
210
-
211
-
212
-
213
-
214
-
215
-
216
-
217
-
218
-
219
-
220
-
221
-
222
-
223
-
224
-
225
-
226
-
227
-
228
-
229
-
230
-
231
-
232
-
233
-
234
-
235
-
236
-
237
-
238
-
239
-
240
-
241
-
242
-
243
-
244
-
245
-
246
 |
 |
