Netgear WFS709TP WFS709TP Setup Manual - Page 206
Language Customization
 |
UPC - 606449052336
View all Netgear WFS709TP manuals
Add to My Manuals
Save this manual to your list of manuals |
Page 206 highlights
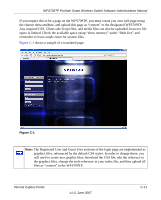
WFS709TP ProSafe Smart Wireless Switch Software Administration Manual } } if (errmsg && errmsg.length > 0) { errmsg = "\n" + errmsg + "\n\n"; document.write(errmsg); } } Language Customization The ability to customize the internal captive portal provides you with a very flexible interface to the captive portal system. However, other than posting site-specific messages onto the captive portal website, the most common type of customization is likely to be language localization. This section describes a simple method for creating a native language captive portal implementation using the internal captive portal system. 1. First, customize the page to your liking (see "Personalizing the Captive Portal Page" in Chapter 8). To do this, navigate to the Maintenance > Customize Captive Portal in the browser interface. For example, choose a page design, upload a custom logo and/or a custom background. Also include any page text and acceptable use policy that you would like on the page. We recommend that you put this in your target language so it will not need to be translated later. 2. Ensure that Guest login is enabled or disabled, as you prefer. Navigate to Configuration > Authentication Methods > Captive Portal and select or deselect Enable Guest Login, if necessary. 3. Click Submit and then click on View Captive Portal. Check that your customization and text/ html is correct, with the default interface still in English and the character set still autodetecting ISO-8859-1. Repeat steps 1 through 3 until you are satisfied with your page. C-6 Internal Captive Portal v1.0, June 2007
-
 1
1 -
2
-
3
-
4
-
5
-
6
-
7
-
8
-
9
-
10
-
11
-
12
-
13
-
14
-
15
-
16
-
17
-
18
-
19
-
20
-
21
-
22
-
23
-
24
-
25
-
26
-
27
-
28
-
29
-
30
-
31
-
32
-
33
-
34
-
35
-
36
-
37
-
38
-
39
-
40
-
41
-
42
-
43
-
44
-
45
-
46
-
47
-
48
-
49
-
50
-
51
-
52
-
53
-
54
-
55
-
56
-
57
-
58
-
59
-
60
-
61
-
62
-
63
-
64
-
65
-
66
-
67
-
68
-
69
-
70
-
71
-
72
-
73
-
74
-
75
-
76
-
77
-
78
-
79
-
80
-
81
-
82
-
83
-
84
-
85
-
86
-
87
-
88
-
89
-
90
-
91
-
92
-
93
-
94
-
95
-
96
-
97
-
98
-
99
-
100
-
101
-
102
-
103
-
104
-
105
-
106
-
107
-
108
-
109
-
110
-
111
-
112
-
113
-
114
-
115
-
116
-
117
-
118
-
119
-
120
-
121
-
122
-
123
-
124
-
125
-
126
-
127
-
128
-
129
-
130
-
131
-
132
-
133
-
134
-
135
-
136
-
137
-
138
-
139
-
140
-
141
-
142
-
143
-
144
-
145
-
146
-
147
-
148
-
149
-
150
-
151
-
152
-
153
-
154
-
155
-
156
-
157
-
158
-
159
-
160
-
161
-
162
-
163
-
164
-
165
-
166
-
167
-
168
-
169
-
170
-
171
-
172
-
173
-
174
-
175
-
176
-
177
-
178
-
179
-
180
-
181
-
182
-
183
-
184
-
185
-
186
-
187
-
188
-
189
-
190
-
191
-
192
-
193
-
194
-
195
-
196
-
197
-
198
-
199
-
200
-
 201
201 -
 202
202 -
 203
203 -
 204
204 -
 205
205 -
 206
206 -
 207
207 -
 208
208 -
 209
209 -
 210
210 -
 211
211 -
212
-
213
-
214
-
215
-
216
-
217
-
218
-
219
-
220
-
221
-
222
 |
 |
