Netgear XSM7224S XSM7224S Hardware Installation Guide - Page 10
Unpacking the Hardware, Installation, Select a Location - pdf
 |
UPC - 606449073706
View all Netgear XSM7224S manuals
Add to My Manuals
Save this manual to your list of manuals |
Page 10 highlights
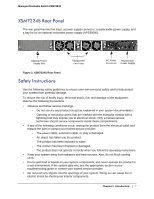
Managed Stackable Switch XSM7224S You can also take the following steps to prevent damage from electrostatic discharge (ESD): 1. When unpacking a static-sensitive component from its shipping carton, leave it in the antistatic package until you are ready to install it. Just before unwrapping the antistatic package, discharge static electricity from your body. 2. Before moving a sensitive component, place it in an antistatic container or package. 3. Handle all sensitive components in a static-safe area. If possible, use antistatic floor pads, workbench pads, and an antistatic grounding strap. Unpacking the Hardware Check the contents of the boxes to make sure that all items are present before installing the switch. 1. Place the container on a clean flat surface and cut all straps securing the container. 2. Unpack the hardware from the boxes. Carefully remove the hardware and place it on a secure and clean surface. See "Select a Location" on page 2-10. 3. Remove all packing material. 4. Make sure that all items are present. See "Package Contents" on page -9. Note: If any item is found missing or damaged, contact your local NETGEAR reseller for replacement. 5. Inspect the products and accessories for damage. Report any damage immediately. Installation Install the equipment in the sequence presented in this section: 1. Select a Location. See "Select a Location" on page -10. 2. Install the Switch. See "Install the Switch" on page -11. 3. Check the installation. See "Check the Installation" on page -12. 4. Apply power and check the LEDs. See "Connect to Power and Check the LEDs" on page -12. Select a Location The switch can be mounted in a standard 19-inch (48.26-centimeter) rack, wall-mounted, or left freestanding (placed on a tabletop). 10 | Chapter 2. Hardware Installation
-
 1
1 -
2
-
3
-
4
-
 5
5 -
 6
6 -
 7
7 -
 8
8 -
 9
9 -
 10
10 -
 11
11 -
 12
12 -
 13
13 -
 14
14 -
 15
15 -
16
-
17
-
18
-
19
-
20
-
21
-
22
-
23
-
24
-
25
-
26
-
27
-
28
-
29
-
30
 |
 |
