Netgear XSM7224S XSM7224S Hardware Installation Guide - Page 19
Connecting Equipment to the Switch, RJ-45 Ports
 |
UPC - 606449073706
View all Netgear XSM7224S manuals
Add to My Manuals
Save this manual to your list of manuals |
Page 19 highlights
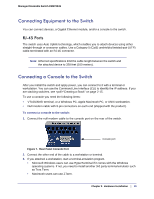
Managed Stackable Switch XSM7224S Connecting Equipment to the Switch You can connect devices, a Gigabit Ethernet module, and/or a console to the switch. RJ-45 Ports The switch uses Auto Uplink technology, which enables you to attach devices using either straight-through or crossover cables. Use a Category 5 (Cat5) unshielded twisted-pair (UTP) cable terminated with an RJ-45 connector. Note: Ethernet specifications limit the cable length between the switch and the attached device to 328 feet (100 meters). Connecting a Console to the Switch After you install the switch and apply power, you can connect to it with a terminal or workstation. You can use the Command Line Interface (CLI) to identify the IP address. If you are stacking switches, see "Creating a Stack" on page 2-15. To use a console you need the following items: • VT100/ANSI terminal, or a Windows PC, Apple Macintosh PC, or UNIX workstation. • Null-modem cable with 9-pin connectors on each end (shipped with the product). To connect a console to the switch: 1. Connect the null-modem cable to the console port on the rear of the switch. Console port Figure 7. Rear Panel Console Port 2. Connect the other end of the cable to a workstation or terminal. 3. If you attached a workstation, start a terminal-emulation program. • Microsoft Windows users can use HyperTerminal if it comes with the Windows operating systems. If not, you need to install another 3rd party terminal emulator such as Tera Term. • Macintosh users can use ZTerm. Chapter 2. Hardware Installation | 19
-
 1
1 -
2
-
3
-
4
-
5
-
6
-
7
-
8
-
9
-
10
-
11
-
12
-
13
-
 14
14 -
 15
15 -
 16
16 -
 17
17 -
 18
18 -
 19
19 -
 20
20 -
 21
21 -
 22
22 -
 23
23 -
 24
24 -
25
-
26
-
27
-
28
-
29
-
30
 |
 |
