Nikon 25544 L3 User Manual - Page 44
Taking Pictures for a Panorama, Panorama assist
 |
UPC - 018208255443
View all Nikon 25544 manuals
Add to My Manuals
Save this manual to your list of manuals |
Page 44 highlights
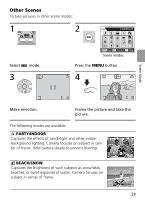
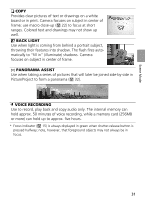
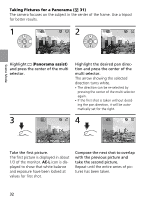
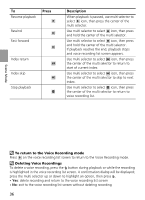
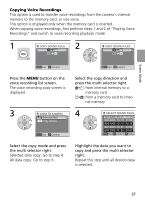
Taking Pictures for a Panorama ( 31) The camera focuses on the subject in the center of the frame. Use a tripod for better results. 1 2 Scene Mode 5 5 Highlight (Panorama assist) and press the center of the multi selector. Highlight the desired pan direction and press the center of the multi selector. The arrow showing the selected direction turns white. • The direction can be re-selected by pressing the center of the multi selector again. • If the first shot is taken without deciding the pan direction, it will be automatically set for the right. 3 4 4 4 Take the first picture. The first picture is displayed in about 1/3 of the monitor. AE-L icon is displayed to show that white balance and exposure have been locked at values for first shot. Compose the next shot to overlap with the previous picture and take the second picture. Repeat until the entire series of pictures has been taken. 32
-
 1
1 -
2
-
3
-
4
-
5
-
6
-
7
-
8
-
9
-
10
-
11
-
12
-
13
-
14
-
15
-
16
-
17
-
18
-
19
-
20
-
21
-
22
-
23
-
24
-
25
-
26
-
27
-
28
-
29
-
30
-
31
-
32
-
33
-
34
-
35
-
36
-
37
-
38
-
 39
39 -
 40
40 -
 41
41 -
 42
42 -
 43
43 -
 44
44 -
 45
45 -
 46
46 -
 47
47 -
 48
48 -
 49
49 -
50
-
51
-
52
-
53
-
54
-
55
-
56
-
57
-
58
-
59
-
60
-
61
-
62
-
63
-
64
-
65
-
66
-
67
-
68
-
69
-
70
-
71
-
72
-
73
-
74
-
75
-
76
-
77
-
78
-
79
-
80
-
81
-
82
-
83
-
84
-
85
-
86
-
87
-
88
-
89
-
90
-
91
-
92
-
93
-
94
-
95
-
96
-
97
-
98
-
99
-
100
-
101
-
102
-
103
-
104
-
105
-
106
-
107
-
108
-
109
-
110
-
111
-
112
-
113
-
114
-
115
-
116
-
117
-
118
-
119
-
120
 |
 |
