Nikon 25544 L3 User Manual - Page 60
Connecting to Televisions, Computers, and Printers
 |
UPC - 018208255443
View all Nikon 25544 manuals
Add to My Manuals
Save this manual to your list of manuals |
Page 60 highlights
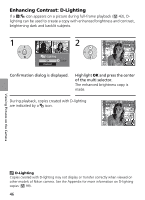
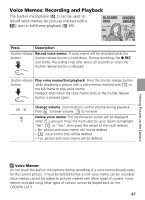
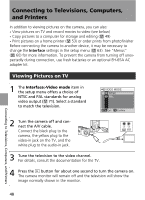
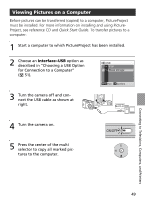
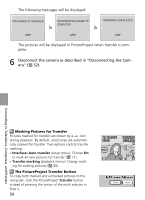
Connecting to Televisions, Computers, and Printers In addition to viewing pictures on the camera, you can also: • View pictures on TV and record movies to video (see below) • Copy pictures to a computer for storage and editing ( 49) • Print pictures on a home printer ( 53) or order prints from photofinisher Before connecting the camera to another device, it may be necessary to change the Interface settings in the setup menu ( 63). See "Menus" ( 60) for more information. To prevent the camera from turning off unexpectedly during connection, use fresh batteries or an optional EH-65A AC adapter kit. Viewing Pictures on TV 1 The Interface>Video mode item in the setup menu offers a choice of NTSC and PAL standards for analog video output ( 71). Select a standard to match the television. VIDEO MODE NTSC PAL MENU Exit OK Confirm 2 Turn the camera off and connect the A/V cable. Connect the black plug to the camera, the yellow plug to the video-in jack on the TV, and the white plug to the audio-in jack. 3 Tune the television to the video channel. For details, consult the documentation for the TV. 4 Press the button for about one second to turn the camera on. The camera monitor will remain off and the television will show the image normally shown in the monitor. Connecting to Televisions, Computers, and Printers 48
-
 1
1 -
2
-
3
-
4
-
5
-
6
-
7
-
8
-
9
-
10
-
11
-
12
-
13
-
14
-
15
-
16
-
17
-
18
-
19
-
20
-
21
-
22
-
23
-
24
-
25
-
26
-
27
-
28
-
29
-
30
-
31
-
32
-
33
-
34
-
35
-
36
-
37
-
38
-
39
-
40
-
41
-
42
-
43
-
44
-
45
-
46
-
47
-
48
-
49
-
50
-
51
-
52
-
53
-
54
-
 55
55 -
 56
56 -
 57
57 -
 58
58 -
 59
59 -
 60
60 -
 61
61 -
 62
62 -
 63
63 -
 64
64 -
 65
65 -
66
-
67
-
68
-
69
-
70
-
71
-
72
-
73
-
74
-
75
-
76
-
77
-
78
-
79
-
80
-
81
-
82
-
83
-
84
-
85
-
86
-
87
-
88
-
89
-
90
-
91
-
92
-
93
-
94
-
95
-
96
-
97
-
98
-
99
-
100
-
101
-
102
-
103
-
104
-
105
-
106
-
107
-
108
-
109
-
110
-
111
-
112
-
113
-
114
-
115
-
116
-
117
-
118
-
119
-
120
 |
 |
