Nikon 4543 Instruction Manual - Page 7
Basic
 |
View all Nikon 4543 manuals
Add to My Manuals
Save this manual to your list of manuals |
Page 7 highlights
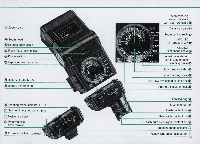
BASIC O P E R A T I O N 1 Set the openl closed knob • ® on the flash unit coupler to the OPEN position. 2 Attach the flash unit . coupler to the flash unit. Position the flash unit and flash unit coupler, so that the secondary flash head ® on the flash unit and the sen- sor (J) on the flash unit coupler face the same direction . Insert the posi- tioning claw ® into the slot ® on the flash unit. Then , whi le applying pressure to the open/closed knob, push the flash unit coupler into the flash unit until it clicks into place . Note: If batteries have already been installed in the battery chamber. make sure the ON/OFF switch ® is at the "o ff " position to avoid acci- dental firing. 7
-
 1
1 -
 2
2 -
 3
3 -
 4
4 -
 5
5 -
 6
6 -
 7
7 -
 8
8 -
 9
9 -
 10
10 -
 11
11 -
 12
12 -
13
-
14
-
15
-
16
-
17
-
18
-
19
-
20
-
21
-
22
-
23
-
24
-
25
-
26
-
27
-
28
-
29
-
30
-
31
-
32
-
33
-
34
-
35
-
36
-
37
-
38
-
39
-
40
-
41
-
42
-
43
-
44
-
45
-
46
-
47
-
48
-
49
-
50
-
51
-
52
-
53
-
54
-
55
-
56
-
57
-
58
-
59
-
60
-
61
-
62
-
63
-
64
-
65
-
66
-
67
-
68
-
69
-
70
-
71
-
72
 |
 |

BASIC
OPERATION------------
1
Set
the
openl
closed
knob
• ®
on
the
flash
unit
coupler
to
the
OPEN
position.
2
Attach
the
flash
unit
.
coupler
to
the
flash
unit.
Position the flash unit and flash unit
coupler,
so
that the secondary flash
head
®
on
the flash unit and the sen-
sor
(J)
on
the flash unit coupler face
the same direction. Insert the posi-
tioning claw
®
into the slot
®
on
the
flash unit.
Then, while applying pressure to the
open/closed knob, push the fl
ash
unit coupler into the flash unit until
it
clicks into place.
Note:
If
batteries have already been installed
in
the battery chamber. make su
re
the ON/O
FF
switch
®
is
at the "off" position
to
avoid acci-
dental firing.
7