Nintendo USGSKB Instruction Manual - Page 23
Using The Nintendo Wi-fi Usb, Connector Sold Seperately
 |
UPC - 045496717742
View all Nintendo USGSKB manuals
Add to My Manuals
Save this manual to your list of manuals |
Page 23 highlights
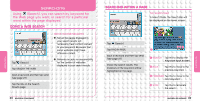
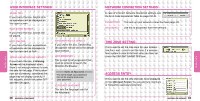
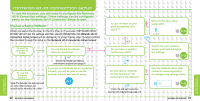
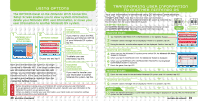
USING THE NINTENDO WI-FI USB CONNECTOR (SOLD SEPERATELY) Before carrying out the procedure explained below, you will need to install the Nintendo Wi-Fi USB Connector Registration Tool on your computer and configure it for use. For details, refer to the Nintendo Wi-Fi USB Connector Instruction Booklet. Note: If your access point supports AOSS (by Buffalo Inc.), you can configure the settings easily using the functions of the system in question. For details, refer to the instruction booklet for your access point. NINTENDO WI-FI CONNECTION SETUP SCREEN NINTENDO WI-FI CONNECTION SETTINGS SCREEN NINTENDO WI-FI CONNECTOR CONNECTION SCREEN Broadband Internet connection DSL or cable modem or equivalent OPERATIONS CARRIED OUT ON THE COMPUTER NOTIFICATION AREA ON WINDOWS TASKBAR Computer + Nintendo Wi-Fi USB Connector CONNECTION TEST SCREEN Double-click here! REGISTRATION TOOLSCREEN Click on the names you want to allow access to! NINTENDO Wi-Fi CONNECTION NINTENDO Wi-Fi CONNECTION Tap the NINTENDO WI-FI CONNECTION SETTINGS Panel. Tap the CONNECT TO YOUR NINTENDO WI-FI USB CONNECTOR Panel. Check that the Nintendo Wi-Fi USB Connector has been configured and then tap NEXT. When you double-click the Nintendo Wi-Fi Connection icon in the notification area on the Windows taskbar, the Registration Tool Screen will be displayed. From the list of Nintendo DS system nicknames displayed on that screen, click the ones you want to allow access to, then click GRANT PERMISSION TO CONNECT on the menu displayed. Tap to begin connection test! If the connection test fails, refer to page 50. SETUP COMPLETE When you have completed the setup, tap (BACK) to exit from the configuration operation.
-
 1
1 -
2
-
3
-
4
-
5
-
6
-
7
-
8
-
9
-
10
-
11
-
12
-
13
-
14
-
15
-
16
-
17
-
 18
18 -
 19
19 -
 20
20 -
 21
21 -
 22
22 -
 23
23 -
 24
24 -
 25
25 -
 26
26 -
 27
27 -
 28
28 -
29
-
30
 |
 |
