Nokia N86 8MP Nokia N86 8MP User Guide in US English - Page 150
Network authentication, Network user name - software update download
 |
View all Nokia N86 8MP manuals
Add to My Manuals
Save this manual to your list of manuals |
Page 150 highlights
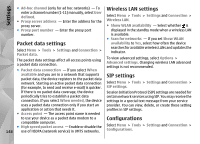
Settings ● Access point - Select the access point to use for the connection, or create a new access point. You can also choose to be asked for the access point every time you start a connection. This setting is available only if you have selected Internet as the bearer type. ● Host address - Enter the web address of the configuration server. ● Port - Enter the port number of the server. ● User name and Password - Enter your user ID and password for the configuration server. ● Allow configuration - Select Yes to allow the server to initiate a configuration session. ● Auto-accept all requests - Select Yes if you do not want the server to ask for your confirmation when it initiates a configuration session. ● Network authentication - Select whether to use http authentication. ● Network user name and Network password - Enter your user ID and password for the http authentication. This setting is available only if you have selected Network authentication to be used. To connect to the server and receive configuration settings for your device, select Options > Start configuration. To view the configuration log of the selected profile, 150 select Options > View log. To update the device software over the air, select Options > Check for updates. The update does not erase your settings. When you receive the update package on your device, follow the instructions on the display. Your device is restarted once the installation is complete. Downloading software updates may involve the transmission of large amounts of data (network service). Make sure that the device battery has enough power, or connect the charger before starting the update. Warning: If you install a software update, you cannot use the device, even to make emergency calls, until the installation is completed and the device is restarted. Be sure to back up data before accepting installation of an update.
-
 1
1 -
2
-
3
-
4
-
5
-
6
-
7
-
8
-
9
-
10
-
11
-
12
-
13
-
14
-
15
-
16
-
17
-
18
-
19
-
20
-
21
-
22
-
23
-
24
-
25
-
26
-
27
-
28
-
29
-
30
-
31
-
32
-
33
-
34
-
35
-
36
-
37
-
38
-
39
-
40
-
41
-
42
-
43
-
44
-
45
-
46
-
47
-
48
-
49
-
50
-
51
-
52
-
53
-
54
-
55
-
56
-
57
-
58
-
59
-
60
-
61
-
62
-
63
-
64
-
65
-
66
-
67
-
68
-
69
-
70
-
71
-
72
-
73
-
74
-
75
-
76
-
77
-
78
-
79
-
80
-
81
-
82
-
83
-
84
-
85
-
86
-
87
-
88
-
89
-
90
-
91
-
92
-
93
-
94
-
95
-
96
-
97
-
98
-
99
-
100
-
101
-
102
-
103
-
104
-
105
-
106
-
107
-
108
-
109
-
110
-
111
-
112
-
113
-
114
-
115
-
116
-
117
-
118
-
119
-
120
-
121
-
122
-
123
-
124
-
125
-
126
-
127
-
128
-
129
-
130
-
131
-
132
-
133
-
134
-
135
-
136
-
137
-
138
-
139
-
140
-
141
-
142
-
143
-
144
-
 145
145 -
 146
146 -
 147
147 -
 148
148 -
 149
149 -
 150
150 -
 151
151 -
 152
152 -
 153
153 -
 154
154 -
 155
155 -
156
-
157
-
158
-
159
-
160
-
161
-
162
-
163
-
164
-
165
-
166
-
167
-
168
-
169
 |
 |
