Oki MICROLINE 1120 Users Guide 1 - Page 71
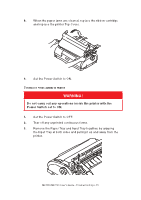
Set the Power Switch to ON.
 |
View all Oki MICROLINE 1120 manuals
Add to My Manuals
Save this manual to your list of manuals |
Page 71 highlights
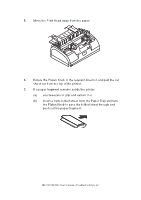
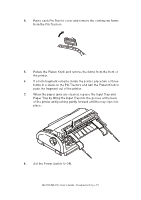
4. Raise each Pin Tractor cover and remove the continuous forms from the Pin Tractors. 5. Rotate the Platen Knob and remove the forms from the front of the printer. 6. If a form fragment remains inside the printer, place two or three forms in a stack on the Pin Tractors and turn the Platen Knob to push the fragment out of the printer. 7. When the paper jams are cleared, replace the Input Tray and Paper Tray by fitting the Input Tray into the gooves at the back of the printer and pushing gently forward until the tray clips into place. 8. Set the Power Switch to ON. ML1120/ML1190 User's Guide - Troubleshooting > 71
-
 1
1 -
2
-
3
-
4
-
5
-
6
-
7
-
8
-
9
-
10
-
11
-
12
-
13
-
14
-
15
-
16
-
17
-
18
-
19
-
20
-
21
-
22
-
23
-
24
-
25
-
26
-
27
-
28
-
29
-
30
-
31
-
32
-
33
-
34
-
35
-
36
-
37
-
38
-
39
-
40
-
41
-
42
-
43
-
44
-
45
-
46
-
47
-
48
-
49
-
50
-
51
-
52
-
53
-
54
-
55
-
56
-
57
-
58
-
59
-
60
-
61
-
62
-
63
-
64
-
65
-
 66
66 -
 67
67 -
 68
68 -
 69
69 -
 70
70 -
 71
71 -
 72
72 -
 73
73 -
 74
74 -
 75
75 -
 76
76 -
77
-
78
-
79
-
80
-
81
-
82
-
83
-
84
-
85
-
86
-
87
-
88
-
89
 |
 |

ML1120/ML1190 User’s Guide - Troubleshooting > 71
4.
Raise each Pin Tractor cover and remove the continuous forms
from the Pin Tractors.
5.
Rotate the Platen Knob and remove the forms from the front of
the printer.
6.
If a form fragment remains inside the printer, place two or three
forms in a stack on the Pin Tractors and turn the Platen Knob to
push the fragment out of the printer.
7.
When the paper jams are cleared, replace the Input Tray and
Paper Tray by fitting the Input Tray into the gooves at the back
of the printer and pushing gently forward until the tray clips into
place.
8.
Set the Power Switch to ON.