Olympus C5500 C-5500 Sport Zoom Advanced Manual - Page 109
Rec view
 |
UPC - 050332153271
View all Olympus C5500 manuals
Add to My Manuals
Save this manual to your list of manuals |
Page 109 highlights
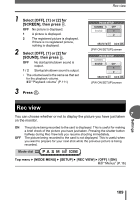
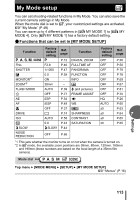
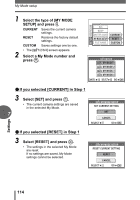
1 Select [OFF], [1] or [2] for [SCREEN], then press b. OFF No picture is displayed. 1 A picture is displayed. 2 The registered picture is displayed. If there is no registered picture, nothing is displayed. 2 Select [OFF], [1] or [2] for [SOUND], then press b. OFF No startup/shutdown sound is output. 1 / 2 Startup/shutdown sound is output. • The volume level is the same as that set for the playback volume. g"Playback volume" (P.111) 3 Press N. Rec view PW ON SETUP SCREEN OFF SOUND 1 2 SELECT GO OK [PW ON SETUP] screen PW ON SETUP SCREEN SOUND OFF 1 2 SELECT GO OK [PW ON SETUP] screen Rec view 7 You can choose whether or not to display the picture you have just taken on the monitor. ON OFF The picture being recorded to the card is displayed. This is useful for making a brief check of the picture you have just taken. Pressing the shutter button halfway during Rec View lets you resume shooting immediately. The picture being recorded to the card is not displayed. This is useful when you want to prepare for your next shot while the previous picture is being recorded. Mode dial Top menu [MODE MENU] [SETUP] [REC VIEW] [OFF] / [ON] g"Menus" (P.16) Settings 109
-
 1
1 -
2
-
3
-
4
-
5
-
6
-
7
-
8
-
9
-
10
-
11
-
12
-
13
-
14
-
15
-
16
-
17
-
18
-
19
-
20
-
21
-
22
-
23
-
24
-
25
-
26
-
27
-
28
-
29
-
30
-
31
-
32
-
33
-
34
-
35
-
36
-
37
-
38
-
39
-
40
-
41
-
42
-
43
-
44
-
45
-
46
-
47
-
48
-
49
-
50
-
51
-
52
-
53
-
54
-
55
-
56
-
57
-
58
-
59
-
60
-
61
-
62
-
63
-
64
-
65
-
66
-
67
-
68
-
69
-
70
-
71
-
72
-
73
-
74
-
75
-
76
-
77
-
78
-
79
-
80
-
81
-
82
-
83
-
84
-
85
-
86
-
87
-
88
-
89
-
90
-
91
-
92
-
93
-
94
-
95
-
96
-
97
-
98
-
99
-
100
-
101
-
102
-
103
-
 104
104 -
 105
105 -
 106
106 -
 107
107 -
 108
108 -
 109
109 -
 110
110 -
 111
111 -
 112
112 -
 113
113 -
 114
114 -
115
-
116
-
117
-
118
-
119
-
120
-
121
-
122
-
123
-
124
-
125
-
126
-
127
-
128
-
129
-
130
-
131
-
132
-
133
-
134
-
135
-
136
-
137
-
138
-
139
-
140
-
141
-
142
-
143
-
144
-
145
-
146
-
147
-
148
-
149
-
150
-
151
-
152
-
153
-
154
-
155
-
156
-
157
-
158
-
159
-
160
-
161
-
162
-
163
-
164
-
165
-
166
-
167
-
168
-
169
-
170
-
171
-
172
-
173
-
174
-
175
-
176
-
177
-
178
-
179
-
180
-
181
-
182
-
183
-
184
-
185
-
186
-
187
-
188
-
189
-
190
-
191
-
192
-
193
-
194
-
195
-
196
-
197
-
198
-
199
 |
 |
