Olympus C5500 C-5500 Sport Zoom Advanced Manual - Page 118
Setting the date and time
 |
UPC - 050332153271
View all Olympus C5500 manuals
Add to My Manuals
Save this manual to your list of manuals |
Page 118 highlights
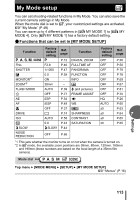
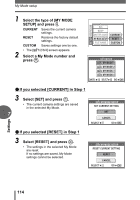
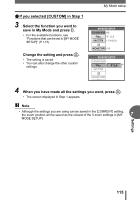
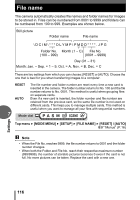
Setting the date and time 1 Adjust the brightness while looking in the monitor, and when you have set the desired level, press N. • Pressing a brightens the monitor, and pressing c darkens it. SELECT GO OK Settings Setting the date and time This function lets you set the date and time. The date and time is saved with each image, and is used in the file name. 100-0030 HQ '05.02.16 15:30 30 7 Mode dial Top menu [SETUP] [ ] Mode dial Top menu [MODE MENU] [SETUP] [ ] 1 Select one of the following date formats: [Y-M-D] (Year/Month/ Day), [M-D-Y] (Month/Day/Year), [D-M-Y] (Day/Month/Year), and press d. • Move to the year setting. • The following steps show the procedure used when the date and time settings are set to [Y-M-D]. g"Menus" (P.16) 2005 . 01 . 01 Y MD 00 : 00 SELECT SET GO OK 118
-
 1
1 -
2
-
3
-
4
-
5
-
6
-
7
-
8
-
9
-
10
-
11
-
12
-
13
-
14
-
15
-
16
-
17
-
18
-
19
-
20
-
21
-
22
-
23
-
24
-
25
-
26
-
27
-
28
-
29
-
30
-
31
-
32
-
33
-
34
-
35
-
36
-
37
-
38
-
39
-
40
-
41
-
42
-
43
-
44
-
45
-
46
-
47
-
48
-
49
-
50
-
51
-
52
-
53
-
54
-
55
-
56
-
57
-
58
-
59
-
60
-
61
-
62
-
63
-
64
-
65
-
66
-
67
-
68
-
69
-
70
-
71
-
72
-
73
-
74
-
75
-
76
-
77
-
78
-
79
-
80
-
81
-
82
-
83
-
84
-
85
-
86
-
87
-
88
-
89
-
90
-
91
-
92
-
93
-
94
-
95
-
96
-
97
-
98
-
99
-
100
-
101
-
102
-
103
-
104
-
105
-
106
-
107
-
108
-
109
-
110
-
111
-
112
-
 113
113 -
 114
114 -
 115
115 -
 116
116 -
 117
117 -
 118
118 -
 119
119 -
 120
120 -
 121
121 -
 122
122 -
 123
123 -
124
-
125
-
126
-
127
-
128
-
129
-
130
-
131
-
132
-
133
-
134
-
135
-
136
-
137
-
138
-
139
-
140
-
141
-
142
-
143
-
144
-
145
-
146
-
147
-
148
-
149
-
150
-
151
-
152
-
153
-
154
-
155
-
156
-
157
-
158
-
159
-
160
-
161
-
162
-
163
-
164
-
165
-
166
-
167
-
168
-
169
-
170
-
171
-
172
-
173
-
174
-
175
-
176
-
177
-
178
-
179
-
180
-
181
-
182
-
183
-
184
-
185
-
186
-
187
-
188
-
189
-
190
-
191
-
192
-
193
-
194
-
195
-
196
-
197
-
198
-
199
 |
 |
