Onkyo HT-R570 Owner Manual - Page 36
Connecting an RI Dock, Connecting the Supplied UP-A1L Dock, If Your iPod Supports Video - remote codes
 |
View all Onkyo HT-R570 manuals
Add to My Manuals
Save this manual to your list of manuals |
Page 36 highlights
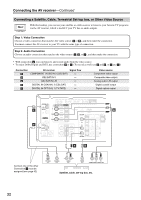
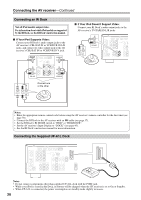
Connecting the AV receiver-Continued Connecting an RI Dock Not all iPod models output video. For information about which iPod models are supported by the RI Dock, see the RI Dock's instruction manual. ■ If Your iPod Supports Video: Connect your RI Dock's audio output jacks to the AV receiver's CBL/SAT IN or VCR/DVR IN L/R jacks, and connect its video output jack to the AV receiver's CBL/SAT IN or VCR/DVR IN V jack. CBL/SAT V IN IN L R CBL/SAT VCR/DVR V IN IN L R VCR/DVR Connect one or the other ■ If Your iPod Doesn't Support Video: Connect your RI Dock's audio output jacks to the AV receiver's TV/TAPE IN L/R jacks. IN L R TV/TAPE Notes: • Enter the appropriate remote control code before using the AV receiver's remote controller for the first time (see page 78). • Connect the RI Dock to the AV receiver with an V cable (see page 37). • Set the RI Dock's RI MODE switch to "HDD" or "HDD/DOCK". • Set the AV receiver's Input Display to "DOCK" (see page 43). • See the RI Dock's instruction manual for more information. Connecting the Supplied UP-A1L Dock Notes: • Do not connect components other than supplied UP-A1L dock with the PORT jack. • While your iPod is seated in the Dock, its battery will be charged when the AV receiver is set to On or Standby. • When UP-A1L is connected, the power consumption on standby mode slightly increases. 36
-
 1
1 -
2
-
3
-
4
-
5
-
6
-
7
-
8
-
9
-
10
-
11
-
12
-
13
-
14
-
15
-
16
-
17
-
18
-
19
-
20
-
21
-
22
-
23
-
24
-
25
-
26
-
27
-
28
-
29
-
30
-
 31
31 -
 32
32 -
 33
33 -
 34
34 -
 35
35 -
 36
36 -
 37
37 -
 38
38 -
 39
39 -
 40
40 -
 41
41 -
42
-
43
-
44
-
45
-
46
-
47
-
48
-
49
-
50
-
51
-
52
-
53
-
54
-
55
-
56
-
57
-
58
-
59
-
60
-
61
-
62
-
63
-
64
-
65
-
66
-
67
-
68
-
69
-
70
-
71
-
72
-
73
-
74
-
75
-
76
-
77
-
78
-
79
-
80
-
81
-
82
-
83
-
84
-
85
-
86
-
87
-
88
-
89
-
90
-
91
-
92
 |
 |
