Onkyo HT-R570 Owner Manual - Page 9
Contents, Introduction, Connections, Basic Operations, Using the Listening Modes, Others - home theater
 |
View all Onkyo HT-R570 manuals
Add to My Manuals
Save this manual to your list of manuals |
Page 9 highlights
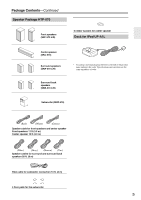
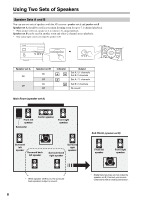
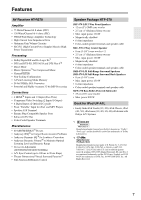
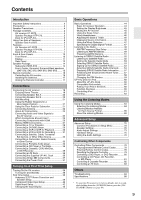
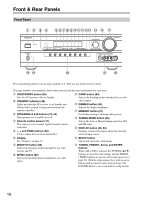
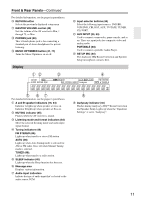
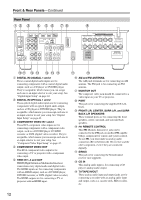
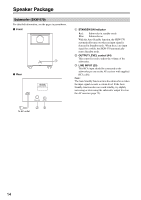
Contents Introduction Important Safety Instructions 2 Precautions 3 Speaker Precautions 4 Package Contents 4 AV receiver HT-R570 4 Speaker Package HTP-570 5 Dock for iPod UP-A1L 5 Using Two Sets of Speakers 6 Speaker Sets A and B 6 Features 7 AV Receiver HT-R570 7 Speaker Package HTP-570 7 Dock for iPod UP-A1L 7 Front & Rear Panels 10 Front Panel 10 Display 11 Rear Panel 12 Speaker Package 14 Subwoofer (SKW-570 14 Front, Center, Surround, Surround Back speakers (SKF-570, SKC-570, SKR-570, SKB-570)........ 15 Remote Controller 16 Controlling the AV receiver 16 Installing the Batteries 17 Aiming the Remote Controller 17 Connections Connecting the AV receiver 18 Enjoying Home Theater 18 Connecting Speaker Set A 20 Connecting Speaker Set B 20 Wall Mounting 21 Using the Rubber Stoppers for a More Stable Platform 21 Using the Floor Pads for Subwoofer 21 Connecting Antenna 22 About AV Connections 24 Connecting Audio and Video Signals to the AV receiver 25 Which Connections Should I Use 25 Connecting Components with HDMI 26 Making HDMI Connections 27 Connecting a TV or Projector 28 Connecting a DVD/BD player 29 Connecting a VCR or DVR for Playback 30 Connecting a VCR or DVR for Recording 31 Connecting a Satellite, Cable, Terrestrial Set-top box, or Other Video Source 32 Connecting a Camcorder, Game Console, or Other Device 33 Connecting a Portable Audio player 33 Connecting a CD Player or Turntable 34 Connecting a Cassette, CDR, MiniDisc, or DAT Recorder 35 Connecting an RI Dock 36 Connecting the Supplied UP-A1L Dock 36 Connecting Onkyo V Components 37 Connecting the Power Cord 37 Turning On & First Time Setup Turning On the AV receiver 38 Turning On and Standby 38 First Time Setup 39 Audyssey 2EQ™ Room Correction and Speaker Setup 39 Component Video Input Setup 42 Digital Input Setup 42 Changing the Input Display 43 Basic Operations Basic Operations 44 Basic AV receiver Operation 44 Setting the Display Brightness 45 Muting the AV receiver 45 Using the Sleep Timer 45 Using Headphones 46 Adjusting the Bass & Treble 46 Displaying Source Information 46 Using the Music Optimizer 47 Specifying the Digital Signal Format 47 Listening to the Radio 48 AM/FM Frequency Step Setup 48 Listening to AM/FM Stations 49 Presetting AM/FM Stations 51 Listening to SIRIUS Satellite Radio 52 Listening to Sattellite Radio 52 Setting the Satellite Radio Mode 53 Selecting SIRIUS Satellite Radio 53 Signing Up for SIRIUS Satellite Radio 53 Selecting SIRIUS Satellite Radio Channels ........ 54 Displaying SIRIUS Satellite Radio Information ........ 57 Positioning the SiriusConnect Home Tuner......... 57 Parental Lock 58 Changing the PIN Number 59 UP-A1L Dock for iPod 60 About the UP-A1L Dock 60 Compatible iPod models 60 Putting Your iPod in the Dock 60 Function Overview 60 Controlling iPod 61 Recording 63 Using the Listening Modes Using the Listening Modes 64 Selecting the Listening Modes 64 Listening Modes Available for Each Source Format 65 About the Listening Modes 68 Advanced Setup Advanced Setup 70 Common Procedures in Setup Menu 70 Speaker Settings 70 Audio Adjust Settings 73 Hardware Setup 75 Using the Audio Settings 76 Controlling Other Components Controlling Other Components 78 Preprogrammed Remote Control Codes 78 Entering Remote Control Codes 78 Resetting the Remote Controller 79 Controlling a DVD Player, or DVD Recorder.......... 80 Controlling a CD Player, CD Recorder, or MD Player 81 Controlling a Cassette Recorder 82 Controlling an RI Dock 83 Others Troubleshooting 84 Specifications 88 * To reset the AV receiver to its factory defaults, turn it on and, while holding down the [VCR/DVR] button, press the [ON/ STANDBY] button (see page 84). 9
-
 1
1 -
2
-
3
-
 4
4 -
 5
5 -
 6
6 -
 7
7 -
 8
8 -
 9
9 -
 10
10 -
 11
11 -
 12
12 -
 13
13 -
 14
14 -
15
-
16
-
17
-
18
-
19
-
20
-
21
-
22
-
23
-
24
-
25
-
26
-
27
-
28
-
29
-
30
-
31
-
32
-
33
-
34
-
35
-
36
-
37
-
38
-
39
-
40
-
41
-
42
-
43
-
44
-
45
-
46
-
47
-
48
-
49
-
50
-
51
-
52
-
53
-
54
-
55
-
56
-
57
-
58
-
59
-
60
-
61
-
62
-
63
-
64
-
65
-
66
-
67
-
68
-
69
-
70
-
71
-
72
-
73
-
74
-
75
-
76
-
77
-
78
-
79
-
80
-
81
-
82
-
83
-
84
-
85
-
86
-
87
-
88
-
89
-
90
-
91
-
92
 |
 |