Onkyo TX-NR509 Owner Manual - Page 16
Connecting Your Components, HDMI OUT, MONITOR OUT V, COMPONENT VIDEO OUT - zone 2
 |
View all Onkyo TX-NR509 manuals
Add to My Manuals
Save this manual to your list of manuals |
Page 16 highlights
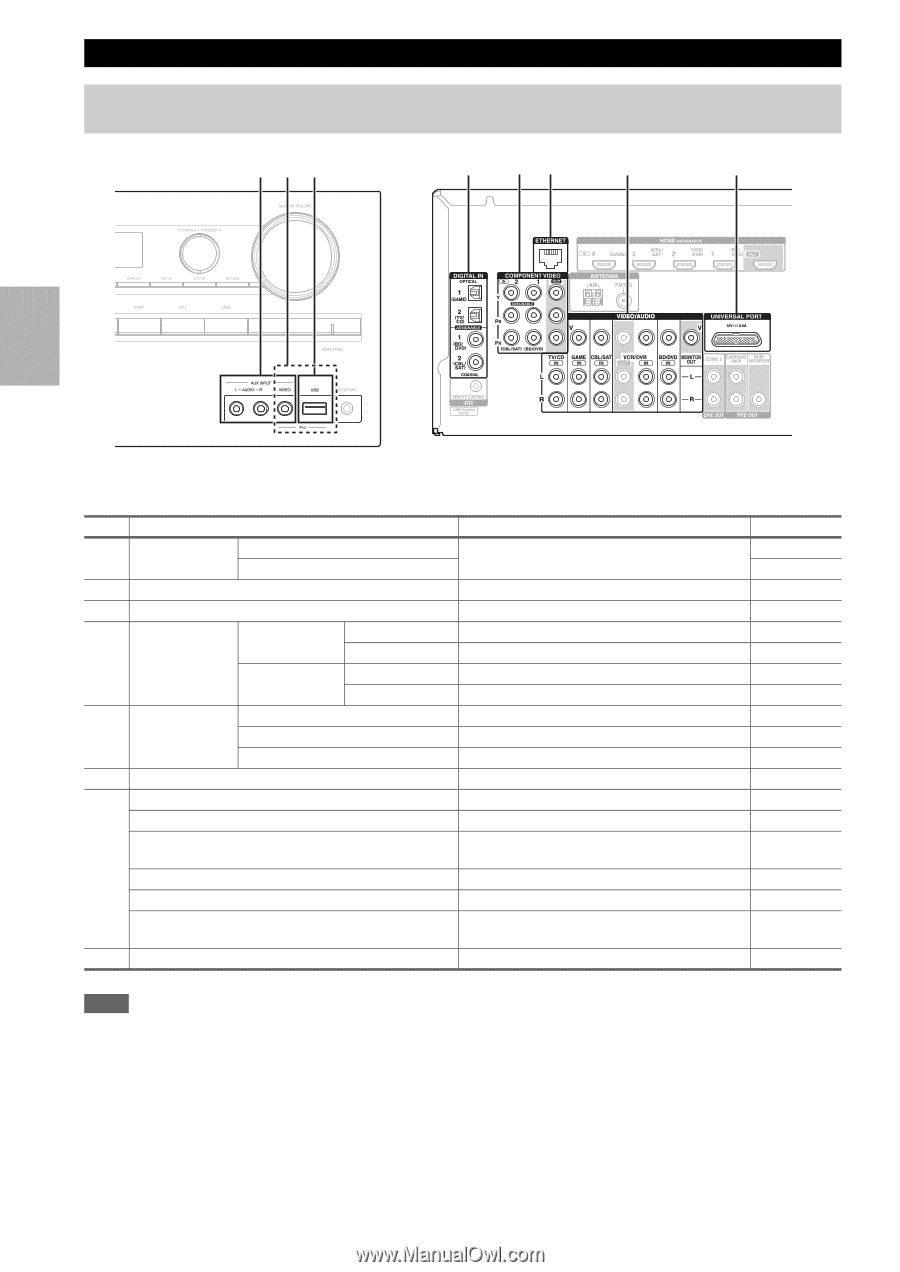
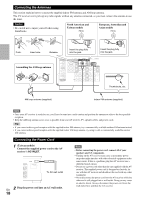
Connecting Your Components The on-screen setup menus appear only on a TV that is connected to the HDMI OUT. If your TV is connected to the MONITOR OUT V or the COMPONENT VIDEO OUT, use the AV receiver's display when changing settings. "#$ % &' ( ) Connect your components to the appropriate jacks. The default input assignments are shown below. See "Connection Tips and Video Signal Path" for more information (➔ page 70). ✔: Assignment can be changed (➔ page 40). No. Jack/Port Components Assignable " AUX INPUT VIDEO Camcorder, etc AUDIO L/R # USB, AUX INPUT VIDEO*1 iPod/iPhone (video playback) $ USB*2 iPod/iPhone, MP3 player, USB flash drive % DIGITAL IN OPTICAL 1 (GAME) Game console ✔ 2 (TV/CD) TV, CD player ✔ COAXIAL 1 (BD/DVD) Blu-ray Disc/DVD player ✔ 2 (CBL/SAT) Satellite/cable set-top box, RI dock, etc. ✔ & COMPONENT IN 1 (BD/DVD) VIDEO IN 2 (CBL/SAT) Blu-ray Disc/DVD player, RI dock ✔ Satellite/cable set-top box, RI dock, etc. ✔ MONITOR OUT TV, projector, etc. ' ETHERNET Router ( MONITOR OUT TV, projector, etc. BD/DVD IN Blu-ray Disc/DVD player VCR/DVR IN VCR or DVD recorder/digital video recorder, RI dock CBL/SAT IN Satellite/cable set-top box, etc. GAME IN Game console, RI dock TV/CD IN TV, CD player, cassette tape deck, MD, CD-R, Turntable*3, RI dock ) UNIVERSAL PORT Universal port option dock (UP-A1 etc.) Note *1 When USB input is selected, you can input video signals from the AUX INPUT VIDEO jack. Video signals input from AUX INPUT VIDEO will be output from the MONITOR OUT jack. *2 Do not connect the AV receiver's USB port to a USB port on your computer. Music on your computer cannot be played through the AV receiver in this way. *3 Connect a turntable (MM) that has a phono preamp built-in. If your turntable (MM) doesn't have it, you'll need a commercially available phono preamp. If your turntable has a moving coil (MC) type cartridge, you'll need a commercially available MC head amp or MC transformer as well as a phono preamp. See your turntable's manual for details. • With connection (, you can listen and record audio from the external components while you are in Zone 2. You can listen and record audio from the external components in the main room; you can listen to the audio in Zone 2 as well. En • With connection %, you can enjoy Dolby Digital and DTS. (To record or listen in Zone 2 as well, use % and (.) 16
-
 1
1 -
2
-
3
-
4
-
5
-
6
-
7
-
8
-
9
-
10
-
 11
11 -
 12
12 -
 13
13 -
 14
14 -
 15
15 -
 16
16 -
 17
17 -
 18
18 -
 19
19 -
 20
20 -
 21
21 -
22
-
23
-
24
-
25
-
26
-
27
-
28
-
29
-
30
-
31
-
32
-
33
-
34
-
35
-
36
-
37
-
38
-
39
-
40
-
41
-
42
-
43
-
44
-
45
-
46
-
47
-
48
-
49
-
50
-
51
-
52
-
53
-
54
-
55
-
56
-
57
-
58
-
59
-
60
-
61
-
62
-
63
-
64
-
65
-
66
-
67
-
68
-
69
-
70
-
71
-
72
-
73
-
74
-
75
-
76
 |
 |