Onkyo TX-NR509 Owner Manual - Page 37
Changing the Input Display, Using the Music Optimizer, Muting the AV Receiver, Using Headphones - remote control
 |
View all Onkyo TX-NR509 manuals
Add to My Manuals
Save this manual to your list of manuals |
Page 37 highlights
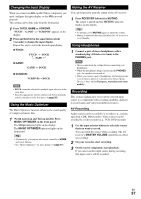
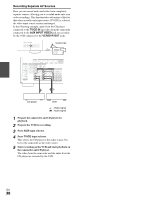
Changing the Input Display When you connect an V-capable Onkyo component, you must configure the input display so that V can work properly. This setting can be done only from the front panel. 1 Press TV/CD, GAME or VCR/DVR. "TV/CD", "GAME" or "VCR/DVR" appears on the display. 2 Press and hold down the same button (about 3 seconds) to change the input display. Repeat this step to select the desired input display. ■ TV/CD: → TV/CD → DOCK TAPE → ■ GAME: GAME ↔ DOCK ■ VCR/DVR: VCR/DVR ↔ DOCK Note • DOCK cannot be selected for multiple input selectors at the same time. • Enter the appropriate remote control code before using the remote controller for the first time (➔ page 56). Using the Music Optimizer The Music Optimizer function enhances the sound quality of compressed music files. 1 (North American and Taiwan models) Press MUSIC OPTIMIZER on the front panel. The M.Opt indicator lights on the display. The MUSIC OPTIMIZER indicator lights on the front panel. Tip • Alternatively, you can use the remote controller's HOME and arrow buttons. • See "Music Optimizer" for more details (➔ page 51). Muting the AV Receiver You can temporarily mute the output of the AV receiver. 1 Press RECEIVER followed by MUTING. The output is muted and the MUTING indicator flashes on the display. Tip • To unmute, press MUTING again or adjust the volume. • Muting is automatically cancelled when the AV receiver is set to Standby. Using Headphones 1 Connect a pair of stereo headphones with a standard plug (1/4 inch or 6.3 mm) to the PHONES jack. Note • Always turn down the volume before connecting your headphones. • While the headphones plug is inserted in the PHONES jack, the speakers are turned off. • When you connect a pair of headphones, the listening mode is set to Stereo, unless it's already set to Stereo, Mono, Direct, or Pure Audio (European, Australian and Asian models). Recording This section explains how to record the selected input source to a component with recording capability, and how to record audio and video from different sources. AV Recording Audio sources can be recorded to a recorder (e.g., cassette tape deck, CDR, MD recorder). Video sources can be recorded to a video recorder (e.g., VCR, DVD recorder). 1 Use the input selector buttons to select the source that you want to record. You can watch the source while recording. The AV receiver's MASTER VOLUME control has no effect on recording. 2 On your recorder, start recording. 3 On the source component, start playback. If you select another input source during recording, that input source will be recorded. En 37
-
 1
1 -
2
-
3
-
4
-
5
-
6
-
7
-
8
-
9
-
10
-
11
-
12
-
13
-
14
-
15
-
16
-
17
-
18
-
19
-
20
-
21
-
22
-
23
-
24
-
25
-
26
-
27
-
28
-
29
-
30
-
31
-
 32
32 -
 33
33 -
 34
34 -
 35
35 -
 36
36 -
 37
37 -
 38
38 -
 39
39 -
 40
40 -
 41
41 -
 42
42 -
43
-
44
-
45
-
46
-
47
-
48
-
49
-
50
-
51
-
52
-
53
-
54
-
55
-
56
-
57
-
58
-
59
-
60
-
61
-
62
-
63
-
64
-
65
-
66
-
67
-
68
-
69
-
70
-
71
-
72
-
73
-
74
-
75
-
76
 |
 |
