Onkyo TX-NR509 Owner Manual - Page 39
Advanced Operations, Advanced Setup, On-screen Setup Menus, Common Procedures in Setup Menu - wireless
 |
View all Onkyo TX-NR509 manuals
Add to My Manuals
Save this manual to your list of manuals |
Page 39 highlights
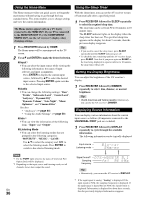
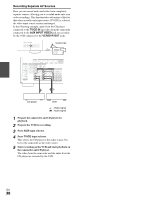
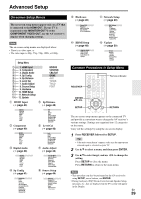
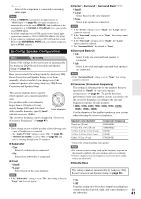
Advanced Operations Advanced Setup On-screen Setup Menus The on-screen setup menus appear only on a TV that is connected to the HDMI OUT. If your TV is connected to the MONITOR OUT V or the COMPONENT VIDEO OUT, use the AV receiver's display when changing settings. Note The on-screen setup menus are displayed when: • There is no video input, or • The video input is 480p, 576p, 720p, 1080i, or 1080p. Setup Menu B 1. HDMI Input C 2. Component D 3. Digital Audio E 4. Sp Config F 5. Sp Distance G 6. Level Cal H 7. Audio Adjust I 8. Source Setup J 9. Hardware K 10. HDMI Setup L 11. Network Setup M 12. Update BD/DVD VCR/DVR CBL/SAT GAME AUX TUNER TV/CD PORT B HDMI Input (➔ page 40) F Sp Distance (➔ page 42) BD/DVD VCR/DVR CBL/SAT GAME AUX TUNER TV/CD PORT C Component (➔ page 40) BD/DVD VCR/DVR CBL/SAT GAME AUX TUNER TV/CD PORT D Digital Audio (➔ page 40) BD/DVD VCR/DVR CBL/SAT GAME AUX TUNER TV/CD PORT E Sp Config (➔ page 41) Unit Left Center Right Surround Right SurrBack Right SurrBack Left Surround Left Subwoofer G Level Cal (➔ page 42) Left Center Right Surround Right SurrBack Right SurrBack Left Surround Left Subwoofer H Audio Adjust (➔ page 43) Input Ch (Mux) Input Ch (Mono) Panorama Dimension Center Width Dolby EX Center Image Listening Angle I Source Setup (➔ page 44) Subwoofer Front Center Surround Surround Back Surround Back Ch Crossover Double Bass Wireless SB Wireless SW Audyssey Dynamic EQ Reference Level Dynamic Volume A/V Sync Name Audio Selector Fixed Mode J Hardware (➔ page 46) Volume OSD Remote ID AM/FM Freq Step Auto Standby UP-A1 ChargeMode K HDMI Setup (➔ page 48) HDMI Ctrl (RIHD) HDMI Through Audio TV Out Audio Return Ch LipSync L Network Setup (➔ page 49) MAC Address DHCP IP Address Subnet Mask Gateway DNS Server Proxy URL Proxy Port Network Control Control Port M Update (➔ page 50) Version Receiver via NET via USB Universal Port via NET via USB Common Procedures in Setup Menu Remote indicator RECEIVER ENTER R/X/F/S SETUP RETURN The on-screen setup menus appear on the connected TV and provide a convenient way to change the AV receiver's various settings. Settings are organized into 12 categories on the menu. Carry out the settings by using the on-screen display. 1 Press RECEIVER followed by SETUP. Tip • If the main menu doesn't appear, make sure the appropriate external input is selected on your TV. 2 Use R/X to select a menu, and then press ENTER. 3 Use R/X to select target, and use F/S to change the setting. Press SETUP to close the menu. Press RETURN to return to the main menu. Note • This procedure can also be performed on the AV receiver by using SETUP, arrow buttons, and ENTER. • During Audyssey 2EQ® Room Correction and Speaker Setup, messages, etc., that are displayed on the TV screen will appear in the Display. En 39
-
 1
1 -
2
-
3
-
4
-
5
-
6
-
7
-
8
-
9
-
10
-
11
-
12
-
13
-
14
-
15
-
16
-
17
-
18
-
19
-
20
-
21
-
22
-
23
-
24
-
25
-
26
-
27
-
28
-
29
-
30
-
31
-
32
-
33
-
 34
34 -
 35
35 -
 36
36 -
 37
37 -
 38
38 -
 39
39 -
 40
40 -
 41
41 -
 42
42 -
 43
43 -
 44
44 -
45
-
46
-
47
-
48
-
49
-
50
-
51
-
52
-
53
-
54
-
55
-
56
-
57
-
58
-
59
-
60
-
61
-
62
-
63
-
64
-
65
-
66
-
67
-
68
-
69
-
70
-
71
-
72
-
73
-
74
-
75
-
76
 |
 |
