Onkyo TX-NR757 User Manual - Page 26
Front Panel, > Before start, > Hookup, > Setup, > Playback, Advanced Manual
 |
View all Onkyo TX-NR757 manuals
Add to My Manuals
Save this manual to your list of manuals |
Page 26 highlights
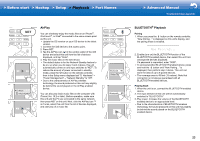
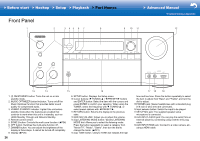
> Before start > Hookup > Setup > Playback > Part Names Front Panel 1 2 3 45 6 7 8 > Advanced Manual Troubleshooting | Appendix 9 10 11 12 13 14 15 16 1. Í ON/STANDBY button: Turns the unit on or into standby mode. 2. MUSIC OPTIMIZER button/indicator: Turns on/off the Music Optimizer function that provides better sound quality for compressed audio. 3. HYBRID STANDBY indicator: Lights if the unit enters standby mode when the features are enabled that continue to work when this unit is in standby, such as HDMI Standby Through and Network Standby. 4. Remote control sensor 5. ZONE 2 button: Controls the multi-zone function. (P24) 6. OFF button: Switches the multi-zone function off. 7. DIMMER button: You can adjust the brightness of the display in three steps. It cannot be turned off completely. 8. Display (P28) 26 9. SETUP button: Displays the Setup menu. 10.Cursor buttons (4 TUNING 3 / 2 PRESET 1 button) and ENTER button: Select the item with the cursors and press ENTER to confirm your selection. When using the TUNER, select the frequency with 4 TUNING 3, or select preset stations with 2 PRESET 1. 11. RETURN button: Returns the display to the previous state. 12.MASTER VOLUME: Allows you to adjust the volume. 13.(Up) LISTENING MODE button / (Down) LISTENING MODE dial: Allows you to select the listening mode. Press the button repeatedly to select a category from "Movie/TV", "Music", "Game", then turn the dial to change the mode. (P21) 14.(Up) TONE button / (Down) TONE dial: Adjusts the high 17 18 19 tone and low tone. Press the button repeatedly to select the item to adjust from "Bass" and "Treble", and turn the dial to adjust. 15.PHONES jack: Stereo headphones with a standard plug (1/4 inch or ø6.3 mm) are connected. 16.Input selector button: Switch the input to be played. 17.SETUP MIC jack: The supplied speaker setup microphone is connected. 18.AUX INPUT AUDIO jack: You can play the audio from an external player by connecting using a stereo mini plug cable. 19.AUX INPUT HDMI jack: Connect to a video camera, etc., using a HDMI cable.
-
 1
1 -
2
-
3
-
4
-
5
-
6
-
7
-
8
-
9
-
10
-
11
-
12
-
13
-
14
-
15
-
16
-
17
-
18
-
19
-
20
-
 21
21 -
 22
22 -
 23
23 -
 24
24 -
 25
25 -
 26
26 -
 27
27 -
 28
28 -
 29
29 -
 30
30 -
 31
31 -
32
-
33
-
34
-
35
-
36
-
37
-
38
-
39
-
40
-
41
-
42
-
43
-
44
-
45
-
46
-
47
-
48
-
49
-
50
-
51
-
52
-
53
-
54
-
55
-
56
-
57
-
58
-
59
-
60
-
61
-
62
-
63
-
64
-
65
-
66
-
67
-
68
-
69
-
70
-
71
-
72
-
73
-
74
-
75
-
76
-
77
-
78
-
79
-
80
-
81
-
82
-
83
-
84
-
85
-
86
-
87
-
88
-
89
-
90
-
91
-
92
-
93
-
94
-
95
-
96
-
97
-
98
 |
 |
