Onkyo TX-RZ840 Owners Manual - English - Page 15
Front Panel, Remote, DIGITAL IN OPTICAL/COAXIAL jacks: Input TV or AV component digital audio - av receiver
 |
View all Onkyo TX-RZ840 manuals
Add to My Manuals
Save this manual to your list of manuals |
Page 15 highlights
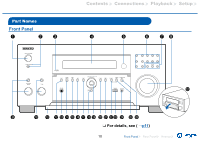
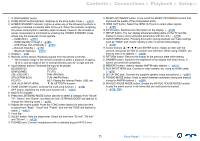
Contents ≫ Connections ≫ Playback ≫ Setup ≫ 1. DIGITAL IN OPTICAL/COAXIAL jacks: Input TV or AV component digital audio signals with a digital optical cable or digital coaxial cable. 2. TUNER AM/FM terminal: Connect the supplied antennas. 3. COMPONENT VIDEO IN jacks: Input AV component video signals with a component video cable. (Compatible only with 480i or 576i resolution.) VIDEO IN jacks: Input AV component video signals with an analog video cable. 4. Wireless antenna: Used for WI-Fi connection or when using a BLUETOOTHenabled device. Adjust the angles according to the connection status. 5. HDMI OUT jacks: Transmit video signals and audio signals with an HDMI cable connected to a monitor such as a TV or projector. 6. RS-232 port: Connect a home control system equipped with an RS-232 port. For adopting a home control system, contact the specialized stores. 7. IR IN port: Connect a remote control receiver unit. ( p83) 8. HDMI IN jacks: Transmit video signals and audio signals with an HDMI cable connected to an AV component. 9. ETHERNET port: Connect to the network with a LAN cable. 10. USB port: Connect a USB storage device to play music files. ( p96) You can also supply power (5 V/1 A) to USB devices with a USB cable. 11. AC INLET: Connect the supplied power cord. 12. GND terminal: Connect the ground wire of the turntable. 13. AUDIO IN jacks: Input AV component audio signals with an analog audio cable. 14. 12V TRIGGER OUT jack: Connect a device equipped with a 12V trigger input jack to enable power link operation between the device and this unit. ( p84) 15. PRE OUT jacks: Connect to a power amplifier. ( p66) 16. SUBWOOFER PRE OUT jacks: Connect a powered subwoofer with a subwoofer cable. Up to two powered subwoofers can be connected. The same signal is output from each SUBWOOFER PRE OUT jack. 17. ZONE 3 PRE/LINE OUT jacks: Output audio signals with an analog audio cable connected to a pre-main amplifier or a power amplifier in a separate room (ZONE 3). HEIGHT 2 PRE OUT jacks: Connect a power amplifier. ( p66) 18. ZONE 2 PRE/LINE OUT jacks: Output audio signals with an analog audio cable connected to a pre-main amplifier or a power amplifier in a separate room (ZONE 2). ZONE B LINE OUT jacks: Connect to a pre-main amplifier with an analog audio cable, and simultaneously output audio of the same source as that of the speakers (ZONE A) connected to this unit. 19. SPEAKERS terminals: Connect speakers with speaker cables. (North American models support banana plugs. Use a plug 4 mm in diameter. Y plug connection is not supported.) 15 Front Panel≫ Rear Panel≫ Remote≫
-
 1
1 -
2
-
3
-
4
-
5
-
6
-
7
-
8
-
9
-
 10
10 -
 11
11 -
 12
12 -
 13
13 -
 14
14 -
 15
15 -
 16
16 -
 17
17 -
 18
18 -
 19
19 -
 20
20 -
21
-
22
-
23
-
24
-
25
-
26
-
27
-
28
-
29
-
30
-
31
-
32
-
33
-
34
-
35
-
36
-
37
-
38
-
39
-
40
-
41
-
42
-
43
-
44
-
45
-
46
-
47
-
48
-
49
-
50
-
51
-
52
-
53
-
54
-
55
-
56
-
57
-
58
-
59
-
60
-
61
-
62
-
63
-
64
-
65
-
66
-
67
-
68
-
69
-
70
-
71
-
72
-
73
-
74
-
75
-
76
-
77
-
78
-
79
-
80
-
81
-
82
-
83
-
84
-
85
-
86
-
87
-
88
-
89
-
90
-
91
-
92
-
93
-
94
-
95
-
96
-
97
-
98
-
99
-
100
-
101
-
102
-
103
-
104
-
105
-
106
-
107
-
108
-
109
-
110
-
111
-
112
-
113
-
114
-
115
-
116
-
117
-
118
-
119
-
120
-
121
-
122
-
123
-
124
-
125
-
126
-
127
-
128
-
129
-
130
-
131
-
132
-
133
-
134
-
135
-
136
-
137
-
138
-
139
-
140
-
141
-
142
-
143
-
144
-
145
-
146
-
147
-
148
-
149
-
150
-
151
-
152
-
153
-
154
-
155
-
156
-
157
-
158
-
159
-
160
-
161
-
162
-
163
-
164
-
165
-
166
-
167
-
168
-
169
-
170
-
171
-
172
-
173
-
174
-
175
-
176
-
177
-
178
-
179
-
180
-
181
-
182
-
183
-
184
-
185
-
186
-
187
-
188
-
189
-
190
-
191
-
192
-
193
-
194
-
195
-
196
-
197
-
198
-
199
-
200
-
201
-
202
 |
 |
