Onkyo TX-SR343 User Manual - Page 11
Basic Operations - av receiver
 |
View all Onkyo TX-SR343 manuals
Add to My Manuals
Save this manual to your list of manuals |
Page 11 highlights
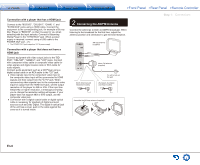
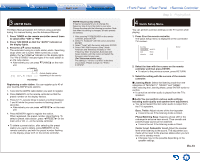
Step 3: Playing Back Step 3: Playing Back 1 Basic Operations Part names and functions of the remote controller 1 2 9 3 F 4 G When using the remote controller to operate the AV receiver: The remote controller of this unit has the remote mode function for controlling other H devices. You cannot control this unit when the remote controller is in the remote mode other than RECEIVER mode (for controlling this unit). Be sure to press F RECEIVER to select the RECEIVER mode before starting operation. 5 6 I 1. Turning the power on. Press 1 z RECEIVER on the remote controller to turn J the power on. ●● Switch the input on the TV to that assigned to the unit. Use the TV's remote controller. 2. Select the input on the unit. 7 Press the 2 INPUT SELECTOR for the player you want to listen to. Press TV to listen to the TV's sound. You can also use the input selector buttons on the main unit. ●● Input will automatically be selected if the TV or player is CEC compliant and connected to the unit with HDMI cable. 3. Select the desired listening mode. 8 K After pressing F RECEIVER, press the 7 listening mode buttons to switch the mode so that you can enjoy different listening modes. 4. Adjust the volume with H VOL. 1 z RECEIVER button: Turns the unit on or into standby mode. 2 REMOTE MODE/INPUT SELECTOR buttons: Switch the input to be played. Furthermore, by registering a particular remote control code to a button, you can switch the remote control mode to operate other equipment by pressing that button. 3 MEMORY button: Registers a radio station. 4 TUN MODE button: Switches the tuning mode. 5 Cursor buttons and ENTER button: Move the cursor and confirms the selection. 6 SETUP button: Displays the screen for making various settings for this unit. 7 Listening mode buttons: Allow you to select the listening mode. MOVIE/TV button: You can select a listening mode suitable for movies and TV programs. MUSIC button: You can select a listening mode suitable for music. GAME button: You can select a listening mode suitable for games. STEREO button: You can select a listening mode for stereo and all channel stereo sources. ●● For details on the listening modes, see the Advanced Manual. 8 DIMMER button: Switches the brightness of the display. 9 MUSIC OPT button: Turns on/off the MUSIC OPTIMIZER function that improves the quality of the compressed audio. F RECEIVER button: Switches the remote controller to the mode for operating this unit. G MUTING button: Temporarily mutes audio. Press again to cancel muting. H VOLUME buttons: Allow you to adjust the volume. This button also cancels the muting. I RETURN button: Returns the display to the previous state. J Q button: Displays the Quick Setup menu that allows you to quickly access the frequently used setting items including sound quality adjustment. K DISPLAY button: Switches the information on the display. En-11
-
 1
1 -
2
-
3
-
4
-
5
-
 6
6 -
 7
7 -
 8
8 -
 9
9 -
 10
10 -
 11
11 -
 12
12 -
 13
13 -
 14
14 -
 15
15 -
 16
16 -
17
-
18
-
19
-
20
-
21
-
22
-
23
-
24
-
25
-
26
-
27
-
28
-
29
-
30
-
31
-
32
-
33
-
34
-
35
-
36
-
37
-
38
-
39
-
40
-
41
-
42
-
43
-
44
-
45
-
46
-
47
-
48
-
49
-
50
-
51
-
52
-
53
-
54
-
55
-
56
-
57
-
58
-
59
-
60
-
61
-
62
-
63
-
64
-
65
-
66
-
67
-
68
-
69
-
70
-
71
-
72
-
73
-
74
-
75
-
76
-
77
-
78
-
79
-
80
-
81
-
82
-
83
-
84
-
85
-
86
 |
 |
