Onkyo TX-SR373 Owners Manual - English - Page 16
Basic Setup
 |
View all Onkyo TX-SR373 manuals
Add to My Manuals
Save this manual to your list of manuals |
Page 16 highlights
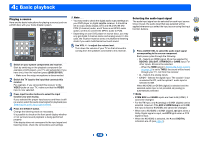
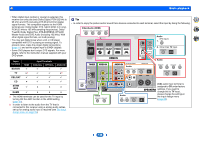
3: Basic Setup Automatically setting up for surround sound (AccuEQ Room Calibration) Place the supplied setup microphone in the listening position, measure the test tones emitted by the speakers, then the unit automatically sets the optimum volume level for each speaker, the crossover frequencies, and the distance from the listening position. This also enables correction of distortion caused by the acoustic environment of the room. CAUTION • The test tones used in the AccuEQ Room Cal. setup are output at high volume. Important • The OSD will not appear if you have connected using the composite output to your TV. Use HDMI connections for AccuEQ Room Cal. setup. • The AccuEQ Room Cal. setup will overwrite any existing speaker settings you've made. • Before using the AccuEQ Room Cal. setup, the USB input should not be selected as an input source. QUICK MENU RECEIVER BD/DVD CBL/SAT STRM BOX AUDIO SEL LATE NIGHT SURR DSP TREBLE 1 Switch on the receiver and your TV. 2 Switch the TV input to the input that connects this receiver to the TV through the corresponding HDMI cable. 3 Connect the microphone to the SETUP MIC jack on the front panel. Make sure there are no obstacles between the speakers and the microphone. TUNING PRESET HOME ENTER RETURN TUNER USB MASTER VOLUME SETUP MIC USB 5V / 0.5A AV RECEIVER TX-SR373 If you have a tripod, use it to place the microphone so that it's about ear level at your normal listening position. Otherwise, place the microphone at ear level using a table or a chair. 4 Press BD/DVD button on the remote control to switch to BD/DVD entry. 5 Press button. The Setup appears on your TV. Use and ENTER on the remote control to navigate through the screens and select menu items. Press to exit the current menu. • Press at any time to exit the Setup. If you cancel the AccuEQ Room Cal. setup at any time, the receiver automatically exits and no settings will be made. • The screensaver automatically starts after three minutes of inactivity. 6 Select "AccuEQ Room Cal." from the Setup, then press ENTER. 2 4 31 Setup 1.AccuEQ Room Cal. 2.Manual SP Setup 3.Input Assign 4.Auto Power Down 5.HDMI Setup Return 7 Press ENTER again. • MIC IN blinks when the microphone is not connected to SETUP MIC jack. Try to be as quiet as possible after pressing ENTER. The system outputs a series of test tones to establish the ambient noise level. 8 Follow the instructions on-screen. • Make sure the microphone is connected. • Make sure the subwoofer is on and the volume is turned up. • See below for notes regarding background noise and other possible interference. 16
-
 1
1 -
2
-
3
-
4
-
5
-
6
-
7
-
8
-
9
-
10
-
 11
11 -
 12
12 -
 13
13 -
 14
14 -
 15
15 -
 16
16 -
 17
17 -
 18
18 -
 19
19 -
 20
20 -
 21
21 -
22
-
23
-
24
-
25
-
26
-
27
-
28
-
29
-
30
-
31
-
32
-
33
-
34
-
35
-
36
-
37
 |
 |
