Onkyo TX-SR373 Owners Manual - English - Page 6
Late Night - not turning on
 |
View all Onkyo TX-SR373 manuals
Add to My Manuals
Save this manual to your list of manuals |
Page 6 highlights
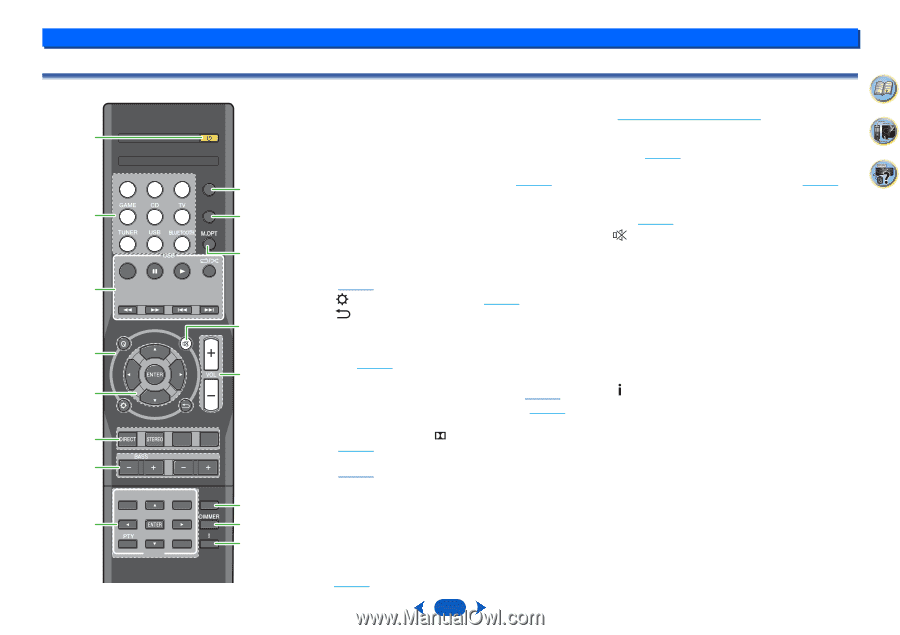
1 Remote control 1 RECEIVER BD/DVD CBL/SAT STRM BOX AUDIO SEL 9 LATE NIGHT 2 10 TOP MENU 11 3 QUICK MENU 12 4 13 5 6 SURR DSP TREBLE 7 DISPLAY TUNING + EDIT SLEEP 14 PRESET - 8 PRESET + 15 TUNING - BAND 16 TUNER RC-928R Controls and displays As for operating other devices, the remote control codes for the Onkyo products are preset. The settings cannot be changed. 1 ÍRECEIVER Switches the receiver between standby and on. 2 Input function buttons Use to select the input source to this receiver (page 18). This will enable you to control other Onkyo components with the remote control. 3 USB control buttons Use to control the USB source. Operations other than USB are not possible. 4 Receiver control buttons Q (QUICK MENU) - Use to access the Audio options (page 25). - Press to access the Setup (page 27). - Use to return to the display immediately previous when making settings 5 ENTER Use the arrow buttons when setting up your surround sound system (page 27). 6 Listening mode and component control buttons DIRECT - Press to select Direct playback (page 24). STEREO - Press to select stereo playback (page 24). SURR - Press for standard decoding and to switch between the modes of Pro Logic II and NEO:6 (page 24). DSP - Switches between the various surround modes (page 24). 7 BASS +/-, TREBLE +/- Use to adjust Bass or Treble. • These controls are disabled when the listening mode is set to DIRECT. • When the front speaker is set at SMALL in the Speaker Setting (or automatically via the AccuEQ Room Cal. setup) and the X.Over is set above 150 Hz, the subwoofer channel level will be adjusted by pressing BASS +/- (page 28). 6 8 TUNER control buttons See Listening to the radio on page 22. 9 AUDIO SEL Press to select the audio input signal of the component to play back (page 18). 10 LATE NIGHT Turns ON and OFF the LATE NIGHT function (page 25). 11 M.OPT Press to restore CD quality sound to compressed audio sources (page 24). 12 Mutes/unmutes the sound. 13 VOL +/- Use to set the listening volume. 14 SLEEP Press to change the amount of time before the receiver switches into standby (30 min - 60 min - 90 min - Off). You can check the remaining sleep time at any time by pressing SLEEP once. 15 DIMMER Dims or brightens the display. The brightness can be controlled in four steps. 16 Switches the display of this unit. The listening mode, sound volume or input name can be checked by selecting an input source. 2 4 31
-
 1
1 -
 2
2 -
 3
3 -
 4
4 -
 5
5 -
 6
6 -
 7
7 -
 8
8 -
 9
9 -
 10
10 -
 11
11 -
 12
12 -
13
-
14
-
15
-
16
-
17
-
18
-
19
-
20
-
21
-
22
-
23
-
24
-
25
-
26
-
27
-
28
-
29
-
30
-
31
-
32
-
33
-
34
-
35
-
36
-
37
 |
 |