Oster NEW Oskar 2-in-1 Salad Prep and Food Processor Instruction Manual - Page 4
About Your Oster® 2in1 Salad Prep, And Food Processor Features, How
 |
View all Oster NEW Oskar 2-in-1 Salad Prep and Food Processor manuals
Add to My Manuals
Save this manual to your list of manuals |
Page 4 highlights
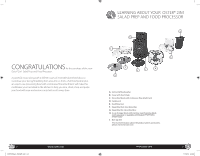
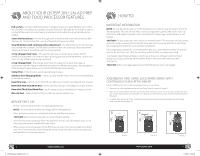
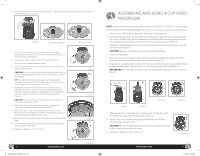
ABOUT YOUR OSTER® 2IN1 SALAD PREP AND FOOD PROCESSOR FEATURES Full-to-Half - This full-to-half food pusher is designed to give you great flexibility and control. You can either use both pieces together to guide food items through the food chute or just use one half of the pusher to control and get consistent results while slicing and shredding stick veggies. Cover with food chute - This see-through cover is the lid for the bowl with continuous flow attachment. The food chute fits a variety of foods for slicing or shredding. Slice/Shred bowl with Continuous Flow Attachment - This attachment locks onto the base and activates the automatic On/Off interlock switch system. The continuous flow attachment allows you to slice or shred food right into a serving bowl. 4-Cup Chopper Bowl Cover - This see-through cover activates the automatic On/Off interlock switch system. The cover also has a pouring opening so that ingredients, such as oil or sauce, can be added slowly during processing. 4-Cup Chopper Bowl - The chopper bowl locks into place on the base. The shape, in combination with the design of the blade, ensures even, efficient processing. The transparency of the processing bowl allows you to monitor the food during processing. Center Post - Holds the discs and chopping blade in place. Stainless Steel Chopping Blade - Use to coarsely or finely chop, mince, mix and purée foods to desired consistency. Food Flow tool - Collects excess food left over after processing for easy disposal and cleaning. Reversible Thin Slice/Shred Disc - Use for ultra-thin slicing or shredding of a variety of foods. Reversible Thick Slice/Shred Disc - Use for coarse slicing or shredding of a variety of foods. Non-slip feet - Keeps processor firmly in place on surfaces while in use. BEFORE FIRST USE • Remove and peel off any stickers and packaging materials. NOTE: do not remove the electrical ratings label on the appliance. • Clean the food processor as instructed in the Care and Cleaning section. CAUTION: blade and processing disc are sharp. Handle carefully. • Select a leveled dry countertop where the appliance is to be used allowing air space on all sides to provide proper ventilation for the motor. • When using your food processor for the first time, you may notice some smoke and a slight odor. This is normal due to some residue left on the motor from the manufacturing process and should be no reason for concern. 6 FPSTFP4xxx_15ESM1.indd 6-7 www.oster.com HOW TO: IMPORTANT INFORMATION NOTE: Do not attempt to chop ice in this food processor; it will damage the bowl and dull the chopping blade. This unit will not whip cream, beat egg whites, grind coffee beans, spices or other items with high oil content, or slice or shred hard-cooked eggs, marshmallows, or soft cheeses. CAUTION: For your protection, this unit has an interlock system. The processor will not operate unless the bowl is properly locked onto the base and cover is properly locked onto the bowl. Do not attempt to defeat the cover interlock mechanism. Do not attempt to operate the unit without the bowl cover, bowl and food chute lid correctly in place. Be sure base is on a flat, dry and clean surface before you begin processing. The stainless steel chopping blade is only for use in the 4-cup chopper bowl for in-bowl chopping, mixing or pureeing. NEVER use the blade in the bowl with continuous flow attachment. CAUTION: Before you begin, please be sure that the electric cord is unplugged. ASSEMBLING AND USING SLICE/SHRED BOWL WITH CONTINUOUS FLOW ATTACHMENT Use this attachment to slice or shred ingredients into your own bowl. 1. Place unit on a flat, leveled surface with the Oster® logo facing you (Figure 1). 2. Place the slice/shred bowl with the continuous flow attachment over the center post of the base and turn until it drops evenly onto the base. Turn bowl to counterclockwise until it locks securely into place (Figure 2). 3. Hold the stem at the top of the food flow tool, place over center post and gently push all the way down into the bowl (Figure 3). FIGURE 1 FIGURE 2 www.oster.com FIGURE 3 7 12/16/15 09:06
-
 1
1 -
 2
2 -
 3
3 -
 4
4 -
 5
5 -
 6
6 -
 7
7 -
 8
8 -
 9
9 -
 10
10 -
11
-
12
-
13
-
14
-
15
-
16
-
17
-
18
-
19
-
20
 |
 |
