Oster NEW Oskar 2-in-1 Salad Prep and Food Processor Instruction Manual - Page 5
Processor
 |
View all Oster NEW Oskar 2-in-1 Salad Prep and Food Processor manuals
Add to My Manuals
Save this manual to your list of manuals |
Page 5 highlights
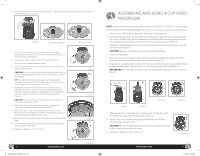
4. Place slice/shred disc onto the food flow tool stem. Place disc with appropriate side up for slicing or for shredding (Figures 4a and 4b). FIGURE 4A FIGURE 4B - SHREDDING 5. Place the cover with food chute on the bowl with the large locking tab to the right side of the bowl, near the horizontal slot at the back of the unit (Figure 5). 6. Place a bowl under continuous flow chute to collect food. 7. Plug unit into a standard electrical outlet 8. Load the feed chute with the food to be processed and position food pusher over food. CAUTION: Never use fingers to push food down the feed chute or to direct food through the continuous flow chute. Always use the food pusher. TIP: Use half of the food pusher to easily control and guide vegetable sticks. Insert half of the food pusher in the unit and use the extra piece to push down the feed chute. 9. Holding food pusher with one hand and food chute with the other, turn the cover counterclockwise toward ON/LOCK until the large locking tab slides into horizontal slot. This engages the automatic interlock switch and turns the food processor on (Figure 6). CAUTION: The unit will not turn on until the locking tab on the bowl cover is locked in the slot. 10. When finished, turn the attachment clockwise toward OFF/ UNLOCK to stop the processor (Figure 7a and 7b). 11. Wait for the disc to stop spinning before removing the cover. Remove cover and carefully remove the slice/shred disc holding it by the short stem and pulling off the bowl. 12. Remove the food flow tool holding it by the stem and lifting off the bowl. 13. To remove the slice/shred bowl, simply turn it to the right until it unlocks and lift off the base. 14. Unplug the appliance when not in use. FIGURE 4B - SLICING FIGURE 5 FIGURE 6 FIGURE 7a 8 FPSTFP4xxx_15ESM1.indd 8-9 www.oster.com FIGURE 7b ASSEMBLING AND USING 4-CUP FOOD PROCESSOR NOTE: Food Processor Bowl only sold with models FPSTFP4050, FPSTFP4100 or sold separately. Use this bowl with the chopping blade to chop, mince, mix and puree a variety of ingredients. 1. Place unit on a flat, leveled surface with the Oster® logo facing you. 2. Place the chopper bowl over the center post of the base. Align the two horizontal tabs at the bottom of the bowl with the indentations on the base and insert bowl onto the base. Turn chopper bowl counterclockwise until it locks securely into place (Figure 8). 3. Carefully hold the blade stem at the top, place blade over center post and gently push all the way down (Figure 9). CAUTION: blade and processing disc are sharp. Handle carefully. 4. Add your ingredients. 5. Place the cover on the chopper bowl with the large locking tab to the right side of the bowl, near the horizontal slot at the back of the unit (Figure 10). 6. Plug unit into a standard electrical outlet. Turn cover counterclockwise toward ON/LOCK to engage the automatic interlock switch and turn the food processor on (Figure 11). IMPORTANT: The unit will not turn on until the locking tab on the bowl cover is locked in the slot. FIGURE 10 FIGURE 8 FIGURE 9 7. When processing is complete, turn chopper bowl clockwise toward OFF/UNLOCK to stop the food processor (Figure 12). 8. Remove the cover and the chopping blade from the bowl before removing the processed food. CAUTION: Be sure chopping blade has completely stopped spinning before removing cover from the bowl. 9. Unplug the appliance when not in use. FIGURE 11 FIGURE 12 www.oster.com 9 12/16/15 09:06
-
 1
1 -
 2
2 -
 3
3 -
 4
4 -
 5
5 -
 6
6 -
 7
7 -
 8
8 -
 9
9 -
 10
10 -
 11
11 -
12
-
13
-
14
-
15
-
16
-
17
-
18
-
19
-
20
 |
 |
