Palsonic PAB3600 Owners Manual - Page 8
How To Use Your Breadmaker
 |
View all Palsonic PAB3600 manuals
Add to My Manuals
Save this manual to your list of manuals |
Page 8 highlights
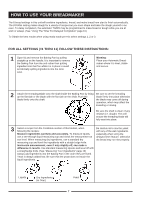
HOW TO USE YOUR BREADMAKER The 8 bread settings in this unit will combine ingredients, knead, and make bread from start to finish automatically. The DOUGH setting makes dough for a variety of recipes but you must shape and bake the dough yourself in an oven. To delay completion, the automatic TIMER may be programmed to make bread or dough while you are at work or asleep. (See "Using The Timer For Delayed Completion" page 10) To Obtain the best results when using ready made pre-mix select settings 1, 2 or 3. FOR ALL SETTINGS (#1 THRU 11) FOLLOW THESE INSTRUCTIONS: 1 Open lid and remove the Baking Pan by pulling straight up on the handle. It is important to remove the Baking Pan from the unit rather than putting ingredient into the Pan while it is in place to avoid accidentally spilling ingredients into the inner case. Warning: Place your Automatic Breadmaker where it is level, stable and secure. 2 Attach the Kneading Blade onto the shaft inside the Baking Pan by lining Be sure to set the kneading up the flat side or the blade with the flat side on the shaft. Push the blade firmly into place otherwise blade firmly onto the shaft. the blade may come off during operation, which may affect the kneading or mixing. Be sure the shaft is clean of any residue (i.e. dough). This will ensure the kneading blade will fully seat into place. 3 Select a recipe from the Cookbook section of this booklet, when following the recipes: Be careful not to mix the yeast with any of the wet ingredients Measure ingredients carefully and accurately. To measure liquids, especially when using the use a see-through liquid measuring cup and check the measurement at delayed timer feature, otherwise eye level. When measuring dry ingredients, use a standard dry the bread may not rise properly. measuring cup and level the ingredients with a straight edge knife. Inaccurate measurement, even if only slightly off, can make a difference in results. Use standard measuring spoons and level off with a straightedge knife. (See "Measuring Your Ingredients" page 16) Always add ingredients into the Baking Pan in the order they are listed. Yeast is always added last. Be sure that the yeast does not touch the liquid ingredients. Liquids Dry Ingredients (ie. flour) Yeast 7
-
 1
1 -
2
-
 3
3 -
 4
4 -
 5
5 -
 6
6 -
 7
7 -
 8
8 -
 9
9 -
 10
10 -
 11
11 -
 12
12 -
 13
13 -
14
-
15
-
16
-
17
-
18
-
19
-
20
-
21
-
22
-
23
-
24
-
25
-
26
-
27
-
28
-
29
-
30
-
31
-
32
-
33
-
34
-
35
-
36
 |
 |
