Panasonic BL-C1CE Ip Camera - Page 38
< Side >, Switch
 |
View all Panasonic BL-C1CE manuals
Add to My Manuals
Save this manual to your list of manuals |
Page 38 highlights
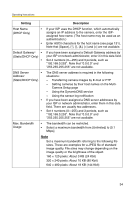
Operating Instructions Note • Some wireless devices do not support the WEP 152 bit encryption. • The camera supports only open system authentication. If the wireless router or access point is set to shared key authentication, set it to auto or open system. 4. Click [Save] when finished. • The new settings are saved. • When finished, "Success!" is displayed. 5. Click [Go to Wireless configuration page]. • The Wireless page is displayed. 6. Set the switch to WIRELESS. Note • • • • • • Encryption helps protect data within wireless LAN from third parties. Enter both the MAC addresses for the camera itself and the camera's wireless module to enable the MAC address filtering feature on the wireless router. The wireless module MAC address is one value higher than the camera MAC address. It takes about 1 minute for the new settings to become effective. It is not possible to access the camera simultaneously by both wired and wireless connection. To communicate using wireless connection, set up the camera using wired connection and flip the switch from WIRED to WIRELESS as shown below. Even if the camera is set to wired connection, it emits electrical waves for about 5 minutes after the power has been on. During this time, the router's wireless indicator is on or blinking. Electrical waves will stop being transmitted after about 5 minutes. < Side > Switch • When you switch from WIRED to WIRELESS or vice versa, restart the camera. Some routers may also need to be restarted after switching. 38
-
 1
1 -
2
-
3
-
4
-
5
-
6
-
7
-
8
-
9
-
10
-
11
-
12
-
13
-
14
-
15
-
16
-
17
-
18
-
19
-
20
-
21
-
22
-
23
-
24
-
25
-
26
-
27
-
28
-
29
-
30
-
31
-
32
-
 33
33 -
 34
34 -
 35
35 -
 36
36 -
 37
37 -
 38
38 -
 39
39 -
 40
40 -
 41
41 -
 42
42 -
 43
43 -
44
-
45
-
46
-
47
-
48
-
49
-
50
-
51
-
52
-
53
-
54
-
55
-
56
-
57
-
58
-
59
-
60
-
61
-
62
-
63
-
64
-
65
-
66
-
67
-
68
-
69
-
70
-
71
-
72
-
73
-
74
-
75
-
76
-
77
-
78
-
79
-
80
-
81
-
82
-
83
-
84
-
85
-
86
-
87
-
88
-
89
-
90
-
91
-
92
-
93
-
94
-
95
-
96
-
97
-
98
-
99
-
100
-
101
-
102
-
103
-
104
-
105
-
106
-
107
-
108
-
109
-
110
-
111
-
112
-
113
-
114
-
115
-
116
-
117
-
118
-
119
-
120
-
121
-
122
-
123
-
124
-
125
-
126
-
127
-
128
-
129
-
130
-
131
-
132
-
133
-
134
-
135
-
136
-
137
-
138
-
139
-
140
-
141
 |
 |
