Panasonic BL-C20A Ip Camera - Page 33
Setting, Description, Masquerade, Virtual Server or Port Mapping. - support
 |
UPC - 037988845057
View all Panasonic BL-C20A manuals
Add to My Manuals
Save this manual to your list of manuals |
Page 33 highlights
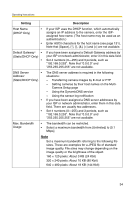
Operating Instructions Note If you do not know the camera IP address when setting [Automatic Setup] or [DHCP Setup], it can be searched for by using the Setup Program (see page 120). Setting Allow Access from • the Internet (Automatic Setup Only) Network • Configuration from Setup Program (Static/DHCP Only) Port Number • (Static/DHCP Only) • • • IP address • • Subnet Mask (Static Only) • • Description The Allow Access from the Internet setting automatically configures the router's Port Forwarding setting (some routers call it "Address Translation", "Static IP Masquerade", "Virtual Server" or "Port Mapping"). To enable Internet access to the camera, check [Yes]. In this case, the camera automatically searches for an unused port number on your network in order from 50000 to 50050. To disable Internet access to the camera, check [No]. To prohibit the Setup Program from changing the network settings, uncheck the box. The default port number is 80. When you use multiple cameras with a router on your network, each camera must be assigned its own port number (see page 41 "2.4.2 Connecting the Camera to a Router that does not Support UPnP™"). - Do not set the following port numbers. FTP: 20 and 21, Telnet: 23, SMTP: 25, DNS: 53, POP3: 110, HTTPS: 443, ICQ: 4000 and IRC: 6661- 6667. Enter a number between 1-65535. Some ISPs do not allow you to use port 80. Ask your ISP or network administrator about which port numbers are accessible over the Internet. If your ISP or network administrator specifies an IP address and subnet mask, enter them in each data field. If you use the camera on a LAN, set an IP address with the same class as your PC (see page 119). Set 4 numbers (0-255) and 3 periods, such as "192.168.0.253". Note that "0.0.0.0" and "255.255.255.255" are not available. [For assistance, please call: 1-800-272-7033] 33
-
 1
1 -
2
-
3
-
4
-
5
-
6
-
7
-
8
-
9
-
10
-
11
-
12
-
13
-
14
-
15
-
16
-
17
-
18
-
19
-
20
-
21
-
22
-
23
-
24
-
25
-
26
-
27
-
 28
28 -
 29
29 -
 30
30 -
 31
31 -
 32
32 -
 33
33 -
 34
34 -
 35
35 -
 36
36 -
 37
37 -
 38
38 -
39
-
40
-
41
-
42
-
43
-
44
-
45
-
46
-
47
-
48
-
49
-
50
-
51
-
52
-
53
-
54
-
55
-
56
-
57
-
58
-
59
-
60
-
61
-
62
-
63
-
64
-
65
-
66
-
67
-
68
-
69
-
70
-
71
-
72
-
73
-
74
-
75
-
76
-
77
-
78
-
79
-
80
-
81
-
82
-
83
-
84
-
85
-
86
-
87
-
88
-
89
-
90
-
91
-
92
-
93
-
94
-
95
-
96
-
97
-
98
-
99
-
100
-
101
-
102
-
103
-
104
-
105
-
106
-
107
-
108
-
109
-
110
-
111
-
112
-
113
-
114
-
115
-
116
-
117
-
118
-
119
-
120
-
121
-
122
-
123
-
124
-
125
-
126
-
127
-
128
-
129
-
130
-
131
-
132
-
133
-
134
-
135
-
136
-
137
-
138
-
139
-
140
-
141
 |
 |