Panasonic BL-C20A Ip Camera - Page 65
Login Timing, Upload File
 |
UPC - 037988845057
View all Panasonic BL-C20A manuals
Add to My Manuals
Save this manual to your list of manuals |
Page 65 highlights
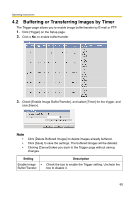
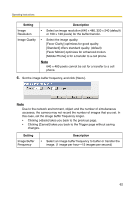
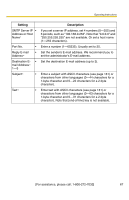
Operating Instructions Setting Server IP • Address or Host Name*1 Port No. • Login ID*2 • Password*2 • Login Timing • Upload File • Name*1 Overwrite • Setting Data • Transfer Method Description If you set a server IP address, set 4 numbers (0-255) and 3 periods, such as "192.168.0.253". Note that "0.0.0.0" and "255.255.255.255" are not available. Or set a host name (1- 255 characters). Enter a number (1-65535). Usually set to 21. If your ISP requires a login ID, set it (0-63 characters). If your ISP requires a password, set it (0-63 characters). Select the login setting for the FTP server. If you set [One Time] and the image buffer frequency value is set within 1 minute, the camera logs in to the server only once. This can reduce transfer time. Set a file name on the FTP server to receive the transferred files. Enter 1-234 characters. Entering "\" creates directories for a file. (E.g. NetworkCamera\image.jpg) Selecting [Overwrite File] overwrites the image on the server with a newer image. Selecting [Save as New File with Time Stamp] saves the image attaching time stamps on the file name, and the images are not overwritten. (E.g. image20050101093020500.jpg) The underlined numbers mean "9h30min20s500ms on January 1, 2005". The letter "s" is inserted after the day when referring to a daylight saving time zone. Select [Passive Mode] normally. If the transfer does not work, select [Active Mode] and check the operation. *1 Note that [Space and [>] are not available. *2 Note that ["] is not available. [For assistance, please call: 1-800-272-7033] 65
-
 1
1 -
2
-
3
-
4
-
5
-
6
-
7
-
8
-
9
-
10
-
11
-
12
-
13
-
14
-
15
-
16
-
17
-
18
-
19
-
20
-
21
-
22
-
23
-
24
-
25
-
26
-
27
-
28
-
29
-
30
-
31
-
32
-
33
-
34
-
35
-
36
-
37
-
38
-
39
-
40
-
41
-
42
-
43
-
44
-
45
-
46
-
47
-
48
-
49
-
50
-
51
-
52
-
53
-
54
-
55
-
56
-
57
-
58
-
59
-
 60
60 -
 61
61 -
 62
62 -
 63
63 -
 64
64 -
 65
65 -
 66
66 -
 67
67 -
 68
68 -
 69
69 -
 70
70 -
71
-
72
-
73
-
74
-
75
-
76
-
77
-
78
-
79
-
80
-
81
-
82
-
83
-
84
-
85
-
86
-
87
-
88
-
89
-
90
-
91
-
92
-
93
-
94
-
95
-
96
-
97
-
98
-
99
-
100
-
101
-
102
-
103
-
104
-
105
-
106
-
107
-
108
-
109
-
110
-
111
-
112
-
113
-
114
-
115
-
116
-
117
-
118
-
119
-
120
-
121
-
122
-
123
-
124
-
125
-
126
-
127
-
128
-
129
-
130
-
131
-
132
-
133
-
134
-
135
-
136
-
137
-
138
-
139
-
140
-
141
 |
 |