Panasonic DMCG5 DMCG5 User Guide - Page 99
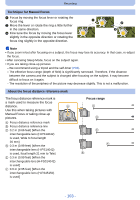
Touch [Set]., Drag the slide bar to change the size of AF area frame.
 |
View all Panasonic DMCG5 manuals
Add to My Manuals
Save this manual to your list of manuals |
Page 99 highlights
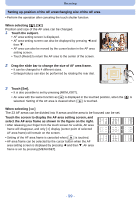
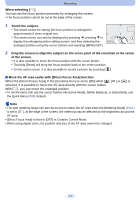
Recording Setting up position of the AF area/changing size of the AF area • Perform the operation after canceling the touch shutter function. When selecting [š], [Ø] Position and size of the AF area can be changed. 1 Touch the subject. • AF area setting screen is displayed. • AF area setting screen can also be displayed by pressing 2 and then 4. • AF area can also be moved by the cursor button in the AF area 5HVHW 6HW setting screen. • Touch [Reset] to return the AF area to the center of the screen. 2 Drag the slide bar to change the size of AF area frame. • It can be changed to 4 different sizes. • Enlarge/reduce can also be performed by rotating the rear dial. 5HVHW 6HW 3 Touch [Set]. • It is also possible to set by pressing [MENU/SET]. • AF area with the same function as [Ø] is displayed in the touched position, when the [š] is selected. Setting of the AF area is cleared when [ ] is touched. When selecting [ ] The 23 AF areas can be divided into 9 areas and the area to be focused can be set. Touch the screen to display the AF area setting screen, and select the AF area frame as shown in the figure on the right. • After releasing your finger from the touch screen for a while, AF area frame will disappear, and only [i] display (center point of selected AF area frame) will remain on the screen. • Setting of the AF area frame is canceled when [ ] is touched. • AF area frame can be selected by the cursor button when the AF area setting screen is displayed by pressing 2 and then 4. AF area frame is set by pressing [MENU/SET]. - 99 -
-
 1
1 -
2
-
3
-
4
-
5
-
6
-
7
-
8
-
9
-
10
-
11
-
12
-
13
-
14
-
15
-
16
-
17
-
18
-
19
-
20
-
21
-
22
-
23
-
24
-
25
-
26
-
27
-
28
-
29
-
30
-
31
-
32
-
33
-
34
-
35
-
36
-
37
-
38
-
39
-
40
-
41
-
42
-
43
-
44
-
45
-
46
-
47
-
48
-
49
-
50
-
51
-
52
-
53
-
54
-
55
-
56
-
57
-
58
-
59
-
60
-
61
-
62
-
63
-
64
-
65
-
66
-
67
-
68
-
69
-
70
-
71
-
72
-
73
-
74
-
75
-
76
-
77
-
78
-
79
-
80
-
81
-
82
-
83
-
84
-
85
-
86
-
87
-
88
-
89
-
90
-
91
-
92
-
93
-
 94
94 -
 95
95 -
 96
96 -
 97
97 -
 98
98 -
 99
99 -
 100
100 -
 101
101 -
 102
102 -
 103
103 -
 104
104 -
105
-
106
-
107
-
108
-
109
-
110
-
111
-
112
-
113
-
114
-
115
-
116
-
117
-
118
-
119
-
120
-
121
-
122
-
123
-
124
-
125
-
126
-
127
-
128
-
129
-
130
-
131
-
132
-
133
-
134
-
135
-
136
-
137
-
138
-
139
-
140
-
141
-
142
-
143
-
144
-
145
-
146
-
147
-
148
-
149
-
150
-
151
-
152
-
153
-
154
-
155
-
156
-
157
-
158
-
159
-
160
-
161
-
162
-
163
-
164
-
165
-
166
-
167
-
168
-
169
-
170
-
171
-
172
-
173
-
174
-
175
-
176
-
177
-
178
-
179
-
180
-
181
-
182
-
183
-
184
-
185
-
186
-
187
-
188
-
189
-
190
-
191
-
192
-
193
-
194
-
195
-
196
-
197
-
198
-
199
-
200
-
201
-
202
-
203
-
204
-
205
-
206
-
207
-
208
-
209
-
210
-
211
-
212
-
213
-
214
-
215
-
216
-
217
-
218
-
219
-
220
-
221
-
222
-
223
-
224
-
225
-
226
-
227
-
228
-
229
-
230
-
231
-
232
 |
 |
