Panasonic DMCZS6 DMCZS5 User Guide - Page 80
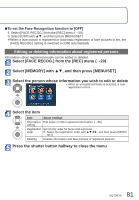
Select [FACE RECOG.] from the [REC] menu, Select [MEMORY]
 |
View all Panasonic DMCZS6 manuals
Add to My Manuals
Save this manual to your list of manuals |
Page 80 highlights
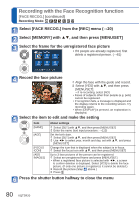
Recording with the Face Recognition function [FACE RECOG.] (continued) Recording Mode: Select [FACE RECOG.] from the [REC] menu (→20) Select [MEMORY] with ▲▼, and then press [MENU/SET] Select the frame for the unregistered face picture • If 6 people are already registered, first delete a registered person. (→81) Record the face picture Align the face with the guide and record. Select [YES] with ▲▼, and then press [MENU/SET]. • If re-recording, select [NO] • Faces of subjects other than people (e.g. pets) cannot be registered. • If recognition fails, a message is displayed and the display returns to the recording screen. Try recording again. • When [DISPLAY] is pressed, an explanation is displayed. Select the item to edit and make the setting Item [NAME] [AGE] [FOCUS ICON] [ADD IMAGES] About settings Select [SET] with ▲▼, and then press [MENU/SET] Enter the name (text input procedure: →113) Set the birth date. Select [SET] with ▲▼, and then press [MENU/SET] Use ◄► to select year, month and day, set with ▲▼, and press [MENU/SET] Change the icon that is displayed when the subject is in focus. Select the focus icon with ▲▼, and then press [MENU/SET] Up to 3 face pictures of the person can be registered. Select an unregistered frame and press [MENU/SET] • When a registered face picture is selected with ◄►, a screen to confirm deletion is displayed. Select [YES] to delete the face picture. (If only one picture is registered, it cannot be deleted.) Record the picture (Step above.) Press Press the shutter button halfway to close the menu 80 VQT2R20
-
 1
1 -
2
-
3
-
4
-
5
-
6
-
7
-
8
-
9
-
10
-
11
-
12
-
13
-
14
-
15
-
16
-
17
-
18
-
19
-
20
-
21
-
22
-
23
-
24
-
25
-
26
-
27
-
28
-
29
-
30
-
31
-
32
-
33
-
34
-
35
-
36
-
37
-
38
-
39
-
40
-
41
-
42
-
43
-
44
-
45
-
46
-
47
-
48
-
49
-
50
-
51
-
52
-
53
-
54
-
55
-
56
-
57
-
58
-
59
-
60
-
61
-
62
-
63
-
64
-
65
-
66
-
67
-
68
-
69
-
70
-
71
-
72
-
73
-
74
-
 75
75 -
 76
76 -
 77
77 -
 78
78 -
 79
79 -
 80
80 -
 81
81 -
 82
82 -
 83
83 -
 84
84 -
 85
85 -
86
-
87
-
88
-
89
-
90
-
91
-
92
-
93
-
94
-
95
-
96
-
97
-
98
-
99
-
100
-
101
-
102
-
103
-
104
-
105
-
106
-
107
-
108
-
109
-
110
-
111
-
112
-
113
-
114
-
115
-
116
-
117
-
118
-
119
-
120
-
121
-
122
-
123
-
124
-
125
-
126
-
127
-
128
-
129
-
130
-
131
-
132
-
133
-
134
-
135
-
136
-
137
-
138
-
139
-
140
-
141
-
142
-
143
-
144
-
145
-
146
-
147
-
148
-
149
-
150
-
151
-
152
-
153
-
154
-
155
-
156
-
157
-
158
-
159
-
160
-
161
-
162
-
163
-
164
-
165
-
166
-
167
-
168
-
169
-
170
-
171
-
172
-
173
-
174
-
175
-
176
-
177
-
178
 |
 |
