Panasonic HCX800 HCX800 User Guide - Page 31
Before recording
 |
View all Panasonic HCX800 manuals
Add to My Manuals
Save this manual to your list of manuals |
Page 31 highlights
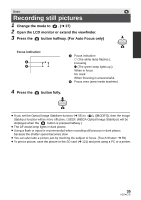
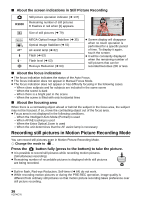
Basic Before recording ∫ Basic camera positioning 1 Hold the unit with both hands. 2 Put your hand through the grip belt. 3 It is convenient to use the recording button icon A when holding the unit at waist level. ≥ When recording, make sure your footing is stable and there is no danger of colliding with another person or object. ≥ When you are outdoors, record pictures with the sunlight behind you. If the subject is backlit, it will become dark in the recording. ≥ Keep your arms near your body and separate your legs for better balance. ≥ Do not cover the microphones or the cooling fan inlet with your hand etc. ∫ Basic motion picture recording ≥ The unit should normally be held steady when recording. ≥ If you move the unit when recording, do so slowly, maintaining a constant speed. ≥ The zoom operation is useful for recording subjects you cannot get close to, but overuse of zoom in and zoom out can make the resulting motion picture less enjoyable to watch. ∫ Recording yourself Rotate the LCD monitor towards the lens side. ≥ The image is horizontally flipped as if you see a mirror image. (However, the image recorded is the same as a normal recording.) ≥ Only some indications will appear on the screen. When appears, return the direction of the LCD monitor to normal position and check the warning/alarm indication. (l 150) ∫ Attaching/Removing the lens hood This will reduce the extra light entering the lens in bright sunlight or backlight etc., making it possible to take clearer pictures. A Attaching the lens hood B Removing the lens hood 31 VQT4C76
-
 1
1 -
2
-
3
-
4
-
5
-
6
-
7
-
8
-
9
-
10
-
11
-
12
-
13
-
14
-
15
-
16
-
17
-
18
-
19
-
20
-
21
-
22
-
23
-
24
-
25
-
 26
26 -
 27
27 -
 28
28 -
 29
29 -
 30
30 -
 31
31 -
 32
32 -
 33
33 -
 34
34 -
 35
35 -
 36
36 -
37
-
38
-
39
-
40
-
41
-
42
-
43
-
44
-
45
-
46
-
47
-
48
-
49
-
50
-
51
-
52
-
53
-
54
-
55
-
56
-
57
-
58
-
59
-
60
-
61
-
62
-
63
-
64
-
65
-
66
-
67
-
68
-
69
-
70
-
71
-
72
-
73
-
74
-
75
-
76
-
77
-
78
-
79
-
80
-
81
-
82
-
83
-
84
-
85
-
86
-
87
-
88
-
89
-
90
-
91
-
92
-
93
-
94
-
95
-
96
-
97
-
98
-
99
-
100
-
101
-
102
-
103
-
104
-
105
-
106
-
107
-
108
-
109
-
110
-
111
-
112
-
113
-
114
-
115
-
116
-
117
-
118
-
119
-
120
-
121
-
122
-
123
-
124
-
125
-
126
-
127
-
128
-
129
-
130
-
131
-
132
-
133
-
134
-
135
-
136
-
137
-
138
-
139
-
140
-
141
-
142
-
143
-
144
-
145
-
146
-
147
-
148
-
149
-
150
-
151
-
152
-
153
-
154
-
155
-
156
-
157
-
158
-
159
-
160
-
161
-
162
-
163
-
164
-
165
-
166
-
167
-
168
-
169
-
170
-
171
-
172
-
173
-
174
-
175
-
176
-
177
-
178
-
179
-
180
-
181
-
182
-
183
-
184
 |
 |
