Panasonic HCX800 HCX800 User Guide - Page 33
Recording motion pictures
 |
View all Panasonic HCX800 manuals
Add to My Manuals
Save this manual to your list of manuals |
Page 33 highlights
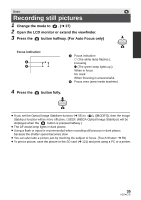
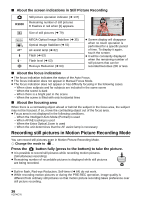
Basic Recording motion pictures 1 Change the mode to . (l 27) 2 Open the LCD monitor or extend the viewfinder. 3 Press the recording start/stop button T to start recording. W A Recording button icon B When you begin recording, ; changes to ¥. 4 Press the recording start/stop button again to pause recording. ≥ Recording can also be started/stopped by touching the recording button icon. This icon functions in the same manner as the recording start/stop button. ∫ Screen indications in the Motion Picture Recording Mode Recording mode Approximate remaining recordable time R 1h20m ≥ When the remaining time is less than 1 minute, R 0h00m flashes red. Recording time elapsed ≥ "h" is an abbreviation for hour, "m" for 0h00m00s minute and "s" for second. ≥ Each time the unit is put into recording pause, the counter display will be reset to 0h00m00s. 0h00m00s R 1h20m ≥ Screen display will disappear when no touch operation is performed for a specific period of time. To display it again, touch the screen. (l 43) ≥ It will be constantly displayed when the remaining recordable time becomes less than 30 minutes. ≥ To change the recording format, change the Recording Mode (l 68) or press and hold the 1080/60p button. (l 56) ≥ Still pictures can be recorded while recording the motion picture. (l 36) ≥ The images recorded between pressing the recording start/stop button to start recording and pressing it again to pause recording become one scene. When you record with the [REC MODE] set to [iFrame], the scenes longer than approximately 20 minutes will be automatically divided. (Recording will continue.) ≥ (Maximum recordable scenes of a single SD card or built-in memory) Recording formats Recordable scenes Different dates (l 95) [1080/60p], [HA], [HG], [HX], [HE] Approx. 3900 Approx. 900 [iFrame] Approx. 89100 Approx. 900 ≥ Maximum number of recordable scenes and maximum number of different dates will be less than above table when there are both iFrame scenes and still pictures recorded on an SD card or the built-in memory. 33 VQT4C76
-
 1
1 -
2
-
3
-
4
-
5
-
6
-
7
-
8
-
9
-
10
-
11
-
12
-
13
-
14
-
15
-
16
-
17
-
18
-
19
-
20
-
21
-
22
-
23
-
24
-
25
-
26
-
27
-
 28
28 -
 29
29 -
 30
30 -
 31
31 -
 32
32 -
 33
33 -
 34
34 -
 35
35 -
 36
36 -
 37
37 -
 38
38 -
39
-
40
-
41
-
42
-
43
-
44
-
45
-
46
-
47
-
48
-
49
-
50
-
51
-
52
-
53
-
54
-
55
-
56
-
57
-
58
-
59
-
60
-
61
-
62
-
63
-
64
-
65
-
66
-
67
-
68
-
69
-
70
-
71
-
72
-
73
-
74
-
75
-
76
-
77
-
78
-
79
-
80
-
81
-
82
-
83
-
84
-
85
-
86
-
87
-
88
-
89
-
90
-
91
-
92
-
93
-
94
-
95
-
96
-
97
-
98
-
99
-
100
-
101
-
102
-
103
-
104
-
105
-
106
-
107
-
108
-
109
-
110
-
111
-
112
-
113
-
114
-
115
-
116
-
117
-
118
-
119
-
120
-
121
-
122
-
123
-
124
-
125
-
126
-
127
-
128
-
129
-
130
-
131
-
132
-
133
-
134
-
135
-
136
-
137
-
138
-
139
-
140
-
141
-
142
-
143
-
144
-
145
-
146
-
147
-
148
-
149
-
150
-
151
-
152
-
153
-
154
-
155
-
156
-
157
-
158
-
159
-
160
-
161
-
162
-
163
-
164
-
165
-
166
-
167
-
168
-
169
-
170
-
171
-
172
-
173
-
174
-
175
-
176
-
177
-
178
-
179
-
180
-
181
-
182
-
183
-
184
 |
 |
