Panasonic KXFPG175 Operating Instructions - Page 12
Please
 |
View all Panasonic KXFPG175 manuals
Add to My Manuals
Save this manual to your list of manuals |
Page 12 highlights
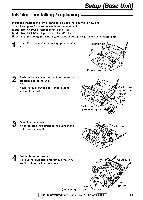
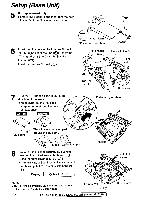
Setup (Base Unit) 5 For replacement only Remove the stoppers and tags from the new ink film Find the 'T' shaped gear (blue) Stopper Tags 6 Insert the blue core of the front ink film roll into the right slot of the unit (T) Insert the 'T' shaped gear (blue) into the left slot of the unit (CI) (g) Insert the rear ink film roll New ink film 'T' shaped gear (blue) Stopper 'T' shaped gear (blue) 2 Left kIN slot Front ink film roll Rear ink film roll R ght 3 slot 4 1 Blue core 7 Turn the 'T' shaped gear (blue) in the direction of the arrow • Make sure that the ink film is 4 wrapped around the blue core at least once Correct Incorrect S 00▪ 0 Tight The ink film is not wrapped around the blue core Blue core K Slack \., Reverse 'T' shaped gear (blue) Ink film 8 Close the back cover securely by pushing down on the dotted area at both ends (CI) Close the front cover securely (0) • The following will be displayed while the unit is checking that there is no slack in the ink film Display PLEASE WAIT Note. • The ink film is completely safe to touch, and will not rub oh on your hands like carbon paper 1 ti3 Front cover Display 12 For fax advantage assistance, call 1-800-435-7329 Dotted area Back cover
-
 1
1 -
2
-
3
-
4
-
5
-
6
-
 7
7 -
 8
8 -
 9
9 -
 10
10 -
 11
11 -
 12
12 -
 13
13 -
 14
14 -
 15
15 -
 16
16 -
 17
17 -
18
-
19
-
20
-
21
-
22
-
23
-
24
-
25
-
26
-
27
-
28
-
29
-
30
-
31
-
32
-
33
-
34
-
35
-
36
-
37
-
38
-
39
-
40
-
41
-
42
-
43
-
44
-
45
-
46
-
47
-
48
-
49
-
50
-
51
-
52
-
53
-
54
-
55
-
56
-
57
-
58
-
59
-
60
-
61
-
62
-
63
-
64
-
65
-
66
-
67
-
68
-
69
-
70
-
71
-
72
-
73
-
74
-
75
-
76
-
77
-
78
-
79
-
80
-
81
-
82
-
83
-
84
-
85
-
86
-
87
-
88
-
89
-
90
-
91
-
92
-
93
-
94
-
95
-
96
 |
 |
