Panasonic KXFPG175 Operating Instructions - Page 13
Paper, Recording, paper
 |
View all Panasonic KXFPG175 manuals
Add to My Manuals
Save this manual to your list of manuals |
Page 13 highlights
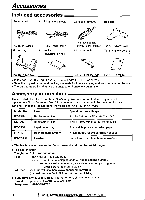
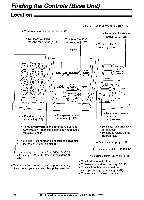
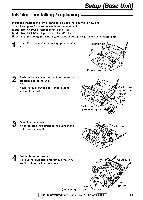
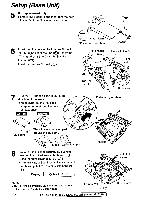
Paper tray Insert the tab on the paper tray into the slot on the back of the unit Paper tray Tab Setup (Base Unit) To use A4 size paper Insert the bottom tab on the A4 paper guide into the lower slot Press the guide into the upper slot Change the recording paper size (feature #16 on page 69) Paper tray A4 paper guide Slat Note Do not place the unit in areas where the paper tray may be obstructed e by a wall, etc ) Recording paper Upper slot Bottom tab Lower slot To use legal size paper Please purchase a legal paper tray, Model No HX-FA51 (p 8) and install as shown on the left KX-FA51 Legal paper tray Letter, legal or A4 size recording paper can be loaded The unit can hold up to 50 sheets of 60 g/m2 to 75 g/m2 (16 lb to 20 lb ) paper or 30 sheets of 90 g/m2 (24 lb ) paper See the note for paper specifications on page 93 For superior results, we recommend Hammermill Jet Print paper 1 Fan the stack of paper to prevent a paper jam 2 Pull the tension bar forward and hold open while inserting the paper ■ The paper should not be over the tab ■ If the paper is not inserted correctly, readjust the paper, or the paper may jam Correct Incorrect Stack of paper 411'Side to be punted face down Tension bar O Adding paper 1_ Pull the tension bar forward and hold open while removing all of the installed paper 2 Add paper to the removed paper and straighten 3_ Fan the slack of paper 4 Pull the tension bar forward and hold open while inserting the paper Tension bar 01 O For fax advantage assistance, call 1-800-435-7329 Tab 13
-
 1
1 -
2
-
3
-
4
-
5
-
6
-
7
-
 8
8 -
 9
9 -
 10
10 -
 11
11 -
 12
12 -
 13
13 -
 14
14 -
 15
15 -
 16
16 -
 17
17 -
 18
18 -
19
-
20
-
21
-
22
-
23
-
24
-
25
-
26
-
27
-
28
-
29
-
30
-
31
-
32
-
33
-
34
-
35
-
36
-
37
-
38
-
39
-
40
-
41
-
42
-
43
-
44
-
45
-
46
-
47
-
48
-
49
-
50
-
51
-
52
-
53
-
54
-
55
-
56
-
57
-
58
-
59
-
60
-
61
-
62
-
63
-
64
-
65
-
66
-
67
-
68
-
69
-
70
-
71
-
72
-
73
-
74
-
75
-
76
-
77
-
78
-
79
-
80
-
81
-
82
-
83
-
84
-
85
-
86
-
87
-
88
-
89
-
90
-
91
-
92
-
93
-
94
-
95
-
96
 |
 |
