Panasonic PV-GS50S Operating Instructions - Page 29
Quick Start
 |
View all Panasonic PV-GS50S manuals
Add to My Manuals
Save this manual to your list of manuals |
Page 29 highlights
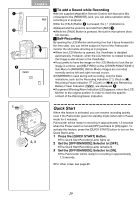
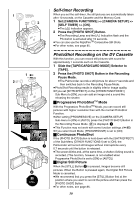
CAMERA 1 REC 2 3 x ° 1 QUICK START OF F ON MODE 2, 3 ª To add a Sound while Recording With the supplied MagicWire Remote Control with Narration Mic connected to the [REMOTE] Jack, you can add a narration while recording is in progress. While the [TALK] Button 2 is pressed, the [ ] Indication is displayed and the sound is recorded from [MIC] 1. ≥While the [TALK] Button is pressed, the built-in microphone does not operate. ª Self-Recording By opening the LCD Monitor and turning it so that it faces forward (to the lens side), you can let the subject in front of the Palmcorder monitor the shot while shooting is in progress. ≥When the LCD Monitor is opened, the Viewfinder is disabled automatically. However, when the LCD Monitor is rotated forward, the image is also shown in the Viewfinder. ≥If you prefer to have the image on the LCD Monitor to look like an image in a mirror, set [SELF REC] on the [OTHER FUNCTIONS1] Sub-Menu to [MIRROR]. (Mirror Mode) Images are recorded normally and no left and right reversal occurs. ≥If [MIRROR] is used during self-recording, only the basic indications, such as the Recording Indication [ ] (Red) or [¥], Recording Pause Indication [ ] (Cyan) or [¥;] and Remaining Battery Power Indication [x], are displayed. 3 ≥If a general Warning/Alarm Indication [°] appears, return the LCD Monitor to the original position in order to check the specific content of the Warning/Alarm Indication. Quick Start When this feature is activated, you can resume recording quickly even if the Palmcorder goes into standby mode (when left in Pause mode for 5 minutes). Palmcorder will be ready for shooting in approximately 1.3 seconds when the Power switch is turned [OFF] and back to [ON] again. To activate this feature, press the [QUICK START] button to turn on the Quick Start Lamp. 1 Press the [QUICK START] Button. ≥The Quick Start Recording Lamp lights up. 2 Set the [OFF/ON/MODE] Selector to [OFF]. ≥The Quick Start Recording Lamp remains lit. 3 Set the [OFF/ON/MODE] Selector to [ON]. ≥The Palmcorder will be ready for recording in approximately 1.3 seconds. ≥For other notes, see page 85. 29
-
 1
1 -
2
-
3
-
4
-
5
-
6
-
7
-
8
-
9
-
10
-
11
-
12
-
13
-
14
-
15
-
16
-
17
-
18
-
19
-
20
-
21
-
22
-
23
-
 24
24 -
 25
25 -
 26
26 -
 27
27 -
 28
28 -
 29
29 -
 30
30 -
 31
31 -
 32
32 -
 33
33 -
 34
34 -
35
-
36
-
37
-
38
-
39
-
40
-
41
-
42
-
43
-
44
-
45
-
46
-
47
-
48
-
49
-
50
-
51
-
52
-
53
-
54
-
55
-
56
-
57
-
58
-
59
-
60
-
61
-
62
-
63
-
64
-
65
-
66
-
67
-
68
-
69
-
70
-
71
-
72
-
73
-
74
-
75
-
76
-
77
-
78
-
79
-
80
-
81
-
82
-
83
-
84
-
85
-
86
-
87
-
88
-
89
-
90
-
91
-
92
-
93
-
94
-
95
-
96
-
97
-
98
-
99
-
100
-
101
-
102
-
103
-
104
-
105
-
106
-
107
-
108
-
109
-
110
-
111
-
112
 |
 |
