Panasonic SAPM91D SAPM91 User Guide - Page 29
Using Other Equipment, Home Theater - Enjoying More Powerful Sound, Using An External Unit
 |
View all Panasonic SAPM91D manuals
Add to My Manuals
Save this manual to your list of manuals |
Page 29 highlights
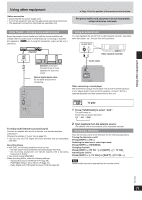
Using other equipment Using other equipment Before connection • Disconnect the AC power supply cord. • Turn off all equipment and read the appropriate operating instructions. • The equipment connections described are examples only. ➡ Page 11 for the position of the remote control buttons. Peripheral cables and equipment are sold separately unless otherwise indicated. Home Theater - Enjoying more powerful sound Enjoy the powerful movie theater and hall-like sound available with multiple channel audio found on DVD-Video by connecting an amplifier and speakers. (DVD-AEven if using this connection, output will be only 2 channels.) Using an external unit You can playback the sound from a video cassette recorder, tape deck, laser disc player, etc., through this unit's speakers. Amplifier Video cassette recorder (DVD) IN Speakers (example) Connect three or more speakers for surround sound. Optical digital audio cable Do not bend sharply when connecting. AM ANT FM ANT EXT LOOP 75Ω AUX R L SUBWOOFER OUT L OPTICAL OUT R S-VIDEO OUT HIGH (6Ω) LOW (6Ω) SPEAKERS (SB-PM91) HAUT-PARLEURS VIDEO OUT PR PB Y COMPONENT VIDEO OUT AC IN Audio cable AM ANT FM ANT EXT LOOP 75Ω AUX R L SUBWOOFER OUT L OPTICAL OUT R AC IN HIGH (6Ω) LOW (6Ω) SPEAKERS (SB-PM91) HAUT-PARLEURS When connecting S-VIDEO OUT a record player VIDEO We recommend usinOUTg a record player with a built-in phono equalizer. If your player doesPnR 'tPB haY ve a built-in equalizer, connect it first to a COMPONENT VIDEO OUT separate equalizer and then connect that to this unit. To play 1 Press [TUNER/AUX] to select "AUX". The unit comes on. Every time you press the button: FM → AM → AUX To enjoy multi-channel surround sound Connect an amplifier with a built-in decoder or a decoder-amplifier combination. Change the settings in "Audio" tab (➡ page 22). • You can only use DTS Digital Surround decoders that are compatible with DVD. Recording Output • With DVD, the following conditions must be met: - the disc doesn't have protection preventing digital recording - the recording equipment can handle signals with a sampling frequency of 48 kHz • You cannot record WMA/MP3. When recording DVDs, make the following settings. - Advanced Surround: SURR OFF (➡ page 26) - PCM Digital Output: Up to 48 kHz (➡ page 22) - Dolby Digital and DTS Digital Surround: PCM (➡ page 22) 2 Start playback from the external source. (For details, refer to the external unit's instruction manual.) Operating a television Face the remote control at the television for the following operations. Turning the television on/off Press [SHIFT] + [TV^]. Switching the television's video input mode Press [SHIFT] + [TV/VIDEO]. Changing channels Press [SHIFT] + [TV CH 1] or [SHIFT] + [2 TV CH]. Adjusting the volume Press [SHIFT] + [- TV VOL] or [SHIFT] + [TV VOL +]. Note Some models cannot be operated by this remote control. RQT7932 29
-
 1
1 -
2
-
3
-
4
-
5
-
6
-
7
-
8
-
9
-
10
-
11
-
12
-
13
-
14
-
15
-
16
-
17
-
18
-
19
-
20
-
21
-
22
-
23
-
 24
24 -
 25
25 -
 26
26 -
 27
27 -
 28
28 -
 29
29 -
 30
30 -
 31
31 -
 32
32 -
 33
33 -
 34
34 -
35
-
36
 |
 |
