Panasonic TC-32A400 Owners Manual - Page 19
Picture, Sound
 |
View all Panasonic TC-32A400 manuals
Add to My Manuals
Save this manual to your list of manuals |
Page 19 highlights
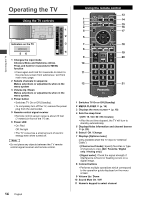
Picture [Reset to defaults] Resets all picture adjustments to factory default settings. ●Press OK to proceed. [Picture mode] Sets the picture mode for each input. [Vivid]: Provides enhanced picture contrast and sharpness for viewing in a well-lit room. [Standard]: Recommended for normal viewing conditions with subdued room lighting. [Cinema]: For watching movies in a darkened room. It provides a soft, film-like picture. [Game]: For playing video games. [Custom (Photo)]: Customizes each item according to your preference. [Photo] is displayed in JPEG menu (full screen). [Back light] Adjusts the luminance of the back light. [Contrast], [Brightness], [Color], [Tint], [Sharpness] Adjusts these items for each picture mode to suit your preferences. [Color temp.] Selects a choice of Cool (blue), Normal, or Warm (red) color. [Cool / Normal / Warm] [A.I. picture] Controls dark areas without affecting the black level or brightness in the overall picture. [Off / On] [Video NR] Reduces noise, commonly called snow. Leave it off when receiving a strong signal. [Off / Weak / Medium / Strong] [Advanced picture] ■ [3D Y/C filter] Minimizes noise and cross-color in the picture. [Off / On] - Available during Analog TV and composite video input only. ■ [Color matrix] Selects image resolution of component-connected devices. [SD / HD] - SD: Standard-Definition - HD: High-Definition - Only used with 480p video signal. ■ [Black level] Adjusts the black level. Valid only for external input signals. [Dark / Light] ■ [MPEG NR] Reduces picture noise in MPEG-compressed video. [Off / On] - For Digital TV only and except for [Game] in [Picture mode]. ■ [3:2 pulldown] Adjusts the picture recorded in 24 fps for optimum quality. [Off / Auto] ■ [Aspect adjustments] - [Screen format]: Changes the format (aspect ratio) depending on the format of received signal (p. 25-26). [FULL / 4:3 / JUST / ZOOM / H-FILL] - [HD size]: Selects the scanning area with Highdefinition signal. [Size 1 / Size 2 / Size 3 / Size 4 Size 1]: Scanning 95 % (select [Size 1] if noise is generated on the edges of the screen). • [Size 2]: Scanning 100 %. • [Size 3]: Scanning 95 % with side mask. • [Size 4]: Scanning 100 % with side mask. • Available when the input signal is HD and [Screen format] is set to [FULL]. Only available for 40" class. - [H size]: Adjusts the horizontal display range to reduce noise of both side edges of an image. [Size 1 / Size 2] • Available when the input signal is SD. • [Size 2]: Adjusts the image size according to the aspect mode to reduce noise (p. 26). - [Zoom adjustments]: Adjusts vertical image position and size. [V-position / V-size] • [V-position]: Vertical position adjustment • [V-size]: Vertical size adjustment • Available when aspect setting is [Zoom]. Note Some menus/items are grayed out depending on the input signal or condition. For example, [3:2 pulldown] will be grayed out if the input signal is high-definition or you are viewing photos, etc. Sound [Reset to defaults] Resets all audio adjustments to factory default settings. ●Press OK to proceed. [Sound mode] Sets your favorite sound mode. [Music]: Improves sound quality for watching music videos, etc. [Speech]: Improves sound quality for watching news, drama, etc. [User]: Adjusts the sounds manually by using the equalizer. In [Music] and [Speech] modes, you can adjust the [Bass] and [Treble] settings, and those settings will be stored for each mode. When you select [User] mode, [Equalizer] is active instead of [Bass] and [Treble]. [Bass] / [Treble] Adjusts the level of bass/treble effect respectively. English 19 Using the Menu Functions
-
 1
1 -
2
-
3
-
4
-
5
-
6
-
7
-
8
-
9
-
10
-
11
-
12
-
13
-
 14
14 -
 15
15 -
 16
16 -
 17
17 -
 18
18 -
 19
19 -
 20
20 -
 21
21 -
 22
22 -
 23
23 -
 24
24 -
25
-
26
-
27
-
28
-
29
-
30
-
31
-
32
-
33
-
34
-
35
-
36
-
37
-
38
-
39
-
40
-
41
-
42
-
43
-
44
-
45
-
46
-
47
-
48
-
49
-
50
-
51
-
52
-
53
-
54
-
55
-
56
-
57
-
58
-
59
-
60
-
61
-
62
-
63
-
64
 |
 |
