Panasonic VDRM30PP VDRM30PP User Guide - Page 81
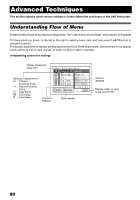
Flow of Menu, Camera Functions Setup, Recording Functions Setup, Date Setup, LCD Setup, Initial Setup
 |
View all Panasonic VDRM30PP manuals
Add to My Manuals
Save this manual to your list of manuals |
Page 81 highlights
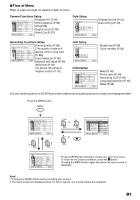
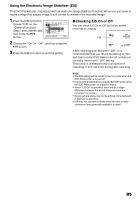
●Flow of Menu Refer to page indicated for details of each function. Camera Functions Setup Came r a Fun c t i ons Se t up P r o g r am AE : Au t o Wh i t e Ba l . : Au t o EIS : On Dig. Zoom : 40x Wi nd Cut : Of f ENTER RETURN RAM Program AE (P. 82) White balance (P. 83) EIS (P. 85) Digital zoom (P. 86) Wind Cut (P. 87) Date Setup Da te Se t up Da t e Mod e : M / D / Y Da t e Se t Display format (P. 51) Date setting (P. 50) ENTER RETURN RAM Recording Functions Setup Record Funct i ons Se t up Movie quality (P. 88) [The quality mode will V I DEO Mode : F I NE I npu t S o u r c e : CAMERA PHOTO I npu t : F i e l d Se l f T i me r : O f f OSD Ou t pu t : On ENTER RETURN RAM appear when using card (P. 89)] Input selection (P. 90) External still input (P. 90) Self-timer (P. 91) On-screen information display output (P. 92) LCD Setup LCD Setup B r i gh t n e s s Co l or L e v e l ENTER RETURN Brightness (P. 93) Color density (P. 93) RAM Initial Setup I n i t i a l Se t up Beep : On Power Save : Of f Re c o r d LED : On Language : Eng l i s h Reset ENTER RETURN RAM Beep (P. 94) Power save (P. 94) Recording LED (P. 95) Language selection (P. 95) Reset (P. 96) You can use the joystick on DVD Palmcorder to select various setting options in menu and designate them. Press the MENU button. Came r a Fun c t i ons Se t up P r o g r am AE : Au t o Wh i t e Ba l . : Au t o EIS : On Dig. Zoom : 40x Wi nd Cut : Of f ENTER RETURN RAM Camer a F u nc t i on s S e t u p or P r o g r am AE Auto Wh i t e Ba l . Spo r t s EIS Por t r a i t Dig. Zoom Spo t l i ght Wi nd Cut Su r f &Snow Low L i gh t ENTER RETURN RAM or Record Funct i ons Se t up V I DEO Mode : F I NE I npu t S o u r c e : CAMERA PHOTO I npu t : F i e l d Se l f T i me r : O f f OSD Ou t pu t : On ENTER RETURN RAM Press the button directly to choose an option from menu. To return to the screen one before, press the button. Pressing the MENU button again will cause the menu screen to disappear. Note: • Pressing the MENU button during recording will not work. • The menu screen will disappear when it is left for approx. one minute without any operation. 81
-
 1
1 -
2
-
3
-
4
-
5
-
6
-
7
-
8
-
9
-
10
-
11
-
12
-
13
-
14
-
15
-
16
-
17
-
18
-
19
-
20
-
21
-
22
-
23
-
24
-
25
-
26
-
27
-
28
-
29
-
30
-
31
-
32
-
33
-
34
-
35
-
36
-
37
-
38
-
39
-
40
-
41
-
42
-
43
-
44
-
45
-
46
-
47
-
48
-
49
-
50
-
51
-
52
-
53
-
54
-
55
-
56
-
57
-
58
-
59
-
60
-
61
-
62
-
63
-
64
-
65
-
66
-
67
-
68
-
69
-
70
-
71
-
72
-
73
-
74
-
75
-
 76
76 -
 77
77 -
 78
78 -
 79
79 -
 80
80 -
 81
81 -
 82
82 -
 83
83 -
 84
84 -
 85
85 -
 86
86 -
87
-
88
-
89
-
90
-
91
-
92
-
93
-
94
-
95
-
96
-
97
-
98
-
99
-
100
-
101
-
102
-
103
-
104
-
105
-
106
-
107
-
108
-
109
-
110
-
111
-
112
-
113
-
114
-
115
-
116
-
117
-
118
-
119
-
120
-
121
-
122
-
123
-
124
-
125
-
126
-
127
-
128
-
129
-
130
-
131
-
132
-
133
-
134
-
135
-
136
-
137
-
138
-
139
-
140
-
141
-
142
-
143
-
144
-
145
-
146
-
147
-
148
-
149
-
150
-
151
-
152
-
153
-
154
-
155
-
156
-
157
-
158
-
159
-
160
-
161
-
162
-
163
-
164
-
165
-
166
-
167
-
168
-
169
-
170
-
171
-
172
-
173
-
174
-
175
-
176
 |
 |
