Panasonic WJHD316A WJHD309A User Guide - Page 10
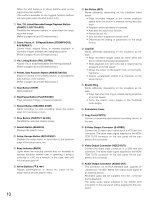
Zoom, Focus, A - B Repeat Button ZOOM/FOCUS, Pan, Tilt, Latest Recorded Image Playback Button
 |
View all Panasonic WJHD316A manuals
Add to My Manuals
Save this manual to your list of manuals |
Page 10 highlights
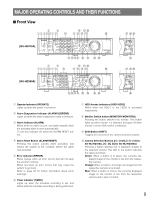
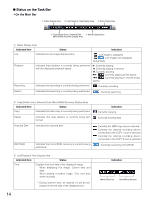
When the shift button is lit, these buttons work as the toggled function buttons. (The buttons available as the toggled function buttons will light green when the shift button is lit.) !1 Pan, Tilt, Latest Recorded Image Playback Button (PAN/TILT, GO TO LAST) Pans/tilts the selected camera, or plays back the latest recorded image. (Refer to pages 45 and 23 respectively.) !2 Zoom, Focus, A - B Repeat Button (ZOOM/FOCUS, A-B REPEAT) Zooms in/out, adjusts focus, or repeats playback of recorded images between two designated points. (Refer to pages 45 and 23 respectively.) !3 Iris, Listing Button (IRIS, LISTED) Adjusts iris, or enables/disables the filtering playback. (Refer to pages 46 and 28 respectively.) !4 Preset, Auto Function Button (PRESET/AUTO) Moves a camera to the preset position, or activates the auto function of the camera. (Refer to pages 46 and 48 respectively.) !5 Stop Button (STOP) Stops playback. !6 Play/Pause Button (PLAY/PAUSE) Plays recorded images, or pauses playback. !7 Record Button (REC/REC STOP) Starts recording. To stop recording, press this button down for 2 seconds or more. !8 Slow Button (PAN/TILT, SLOW) Pans/tilts the selected camera slowly. !9 Search Button (SEARCH) Displays the search menu. @0 Setup, Escape Button (SETUP/ESC) Displays the setup menu, or turns back to the previous page of the setup menu, etc. @1 Busy Indicator (BUSY) Lights when the selected camera was not available to operate because another user is operating it using a controller or a PC via a network. In this case, wait until this indicator goes off. @2 Arrow Buttons (CDAB) Adjusts zooming/focus, or moves the cursor on the setup menus and the search menu. 10 @3 Set Button (SET) Works differently depending on the situations listed below: • Plays recorded images at the current playback speed when this button is pressed during fast playback. • Registers preset positions of cameras. • Activates the auto focus function. • Resets the set iris. • Sets the alarm suspension mode on/off. • Determines the setting of parameters on the setup menus. @4 Jog Dial Works differently depending on the situations as follows: • Plays recorded images frame by frame when this dial is rotated during pausing playback. • Skips playback time when this dial is rotated during playback at normal speed. • Moves the cursor on the search menu or the thumbnail menu. • Selects a parameter setting or a character on the setup menus. @5 Shuttle Ring Works differently depending on the situations as follows: • Plays fast when this ring is rotated during playback at normal speed. • Turns the search menu pages or the thumbnail menu pages. @6 Connectors Cover @7 Copy Port (COPY2) Connect a recommended external recording device to this port. @8 S-Video Output Connector (S-VIDEO) Connect the S-video input connector of a VCR with this connector. The same video signal supplied to the MONITOR OUT2 connector on the rear panel will be supplied to this connector. @9 Video Output Connector (VIDEO OUT) Connect the video input connector of a VCR with this connector. The same video signal supplied to the MONITOR OUT2 connector on the rear panel will be supplied to this connector. #0 Audio Output Connector (AUDIO OUT) This connector, for an RCA standard jack, supplies an unbalanced -10 dBV, 600 Ω line output audio signal to an external device. Recorded audio will be supplied from this connector during playback. The same audio signal supplied to the AUDIO OUT connector on the rear panel will be supplied to this connector.
-
 1
1 -
2
-
3
-
4
-
 5
5 -
 6
6 -
 7
7 -
 8
8 -
 9
9 -
 10
10 -
 11
11 -
 12
12 -
 13
13 -
 14
14 -
 15
15 -
16
-
17
-
18
-
19
-
20
-
21
-
22
-
23
-
24
-
25
-
26
-
27
-
28
-
29
-
30
-
31
-
32
-
33
-
34
-
35
-
36
-
37
-
38
-
39
-
40
-
41
-
42
-
43
-
44
-
45
-
46
-
47
-
48
-
49
-
50
-
51
-
52
-
53
-
54
-
55
-
56
-
57
-
58
-
59
-
60
-
61
-
62
-
63
-
64
-
65
-
66
-
67
-
68
-
69
-
70
-
71
-
72
-
73
-
74
-
75
-
76
-
77
-
78
-
79
-
80
-
81
-
82
-
83
-
84
-
85
-
86
-
87
-
88
-
89
-
90
-
91
-
92
-
93
-
94
-
95
-
96
-
97
-
98
-
99
-
100
-
101
-
102
-
103
-
104
-
105
-
106
-
107
-
108
-
109
-
110
-
111
-
112
-
113
-
114
-
115
-
116
-
117
-
118
-
119
-
120
-
121
-
122
-
123
-
124
-
125
-
126
-
127
-
128
-
129
-
130
-
131
-
132
-
133
-
134
-
135
-
136
-
137
-
138
-
139
-
140
-
141
-
142
-
143
-
144
-
145
-
146
-
147
-
148
-
149
-
150
-
151
-
152
-
153
-
154
-
155
-
156
-
157
-
158
-
159
-
160
-
161
-
162
-
163
-
164
-
165
-
166
-
167
-
168
-
169
-
170
-
171
-
172
-
173
-
174
-
175
-
176
-
177
-
178
-
179
-
180
-
181
-
182
 |
 |