Panasonic WJHD316A WJHD309A User Guide - Page 102
RS232C Setup, Time Table
 |
View all Panasonic WJHD316A manuals
Add to My Manuals
Save this manual to your list of manuals |
Page 102 highlights
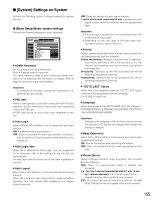
Settings menu Event Event Setup VMD Setup Alarm Setup Terminal Setup Schedule Time Table REC Program Event Program Special Days Switcher Monitor1 Monitor 2 Display OSD Setup Monitor1 Monitor2 Comm Camera Control PS·Data Setup RS485 Setup RS232C Setup NW Setup 1 NW Setup 2 NTP Setup Description Page Perform the settings for the alarm output duration and the buzzer sound when an 114 event (motion detection, video loss, terminal/command alarm) occurs. Perform the settings for the motion detection area, sensitivity and the detection 114 mode for each camera channel. Perform the settings for the alarm display duration and alarm suspension duration. 117 Specify the alarm terminal polarity. 118 Create timetables for each day of the week, and assign the recording action pro- 121 grams and event action programs to the created timetables. Up to 4 recording programs can be created. Perform the settings for the recording actions for each program such as image quality and recording rate for each cam- 119 era channel. Up to 4 event programs can be created. Perform the settings for each program 120 such as the event action and the auto copy function for each event type. Assign timetables independently for special days aside from other days. 123 Perform the settings for the image switching on monitor 1 such as the setting of 124 the sequential display or the screen to be displayed at login on monitor 1. Perform the settings for the image switching on monitor 2 such as the setting of 126 the sequential display or the screen to be displayed at login on monitor 2. Perform the display settings such as the settings for the display position of the 127 camera title and the time. Perform the display settings for monitor 1 such as the camera title display on/off, 128 the alarm display on/off and the time display on/off. Perform the display settings for monitor 2 such as the display mode (task bar 129 style), the camera title display position, and the camera title display on/off. Set the communication type to control cameras for each camera channel. 130 Perform the settings for the PS·Data. It is necessary to perform these settings 130 when connecting an external device such as a controller to the DATA port on the rear panel of this unit. Perform the settings for the RS485. It is necessary to perform these settings when 131 connecting an RS485 compatible camera to the RS485 (CAMERA) port on the rear panel of this unit. Perform the settings for the SERIAL (RS232C). It is necessary to perform these 132 settings when connecting a PC to the SERIAL connector on the rear panel of this unit. Perform the basic network settings. It is necessary to perform these settings when 133 operating this unit via a network such as a LAN. The settings for the user authentication and the host authentication can also be set with these settings. Perform the network connection settings such as IP addresses and the gateway 133 address. It is necessary to perform these settings when operating this unit via a network such as a LAN. Perform the NTP server settings such as the NTP server address and the time 134 zone setting. It is necessary to synchronize the clock with the NTP server. 102
-
 1
1 -
2
-
3
-
4
-
5
-
6
-
7
-
8
-
9
-
10
-
11
-
12
-
13
-
14
-
15
-
16
-
17
-
18
-
19
-
20
-
21
-
22
-
23
-
24
-
25
-
26
-
27
-
28
-
29
-
30
-
31
-
32
-
33
-
34
-
35
-
36
-
37
-
38
-
39
-
40
-
41
-
42
-
43
-
44
-
45
-
46
-
47
-
48
-
49
-
50
-
51
-
52
-
53
-
54
-
55
-
56
-
57
-
58
-
59
-
60
-
61
-
62
-
63
-
64
-
65
-
66
-
67
-
68
-
69
-
70
-
71
-
72
-
73
-
74
-
75
-
76
-
77
-
78
-
79
-
80
-
81
-
82
-
83
-
84
-
85
-
86
-
87
-
88
-
89
-
90
-
91
-
92
-
93
-
94
-
95
-
96
-
 97
97 -
 98
98 -
 99
99 -
 100
100 -
 101
101 -
 102
102 -
 103
103 -
 104
104 -
 105
105 -
 106
106 -
 107
107 -
108
-
109
-
110
-
111
-
112
-
113
-
114
-
115
-
116
-
117
-
118
-
119
-
120
-
121
-
122
-
123
-
124
-
125
-
126
-
127
-
128
-
129
-
130
-
131
-
132
-
133
-
134
-
135
-
136
-
137
-
138
-
139
-
140
-
141
-
142
-
143
-
144
-
145
-
146
-
147
-
148
-
149
-
150
-
151
-
152
-
153
-
154
-
155
-
156
-
157
-
158
-
159
-
160
-
161
-
162
-
163
-
164
-
165
-
166
-
167
-
168
-
169
-
170
-
171
-
172
-
173
-
174
-
175
-
176
-
177
-
178
-
179
-
180
-
181
-
182
 |
 |