Panasonic WJHDE300 WJHDE300 User Guide - Page 12
Digital Disk Recorder, Extension Unit WJ-HDE300, canceled and will be incomplete. During data recovery - extension unit wj hde300
 |
View all Panasonic WJHDE300 manuals
Add to My Manuals
Save this manual to your list of manuals |
Page 12 highlights
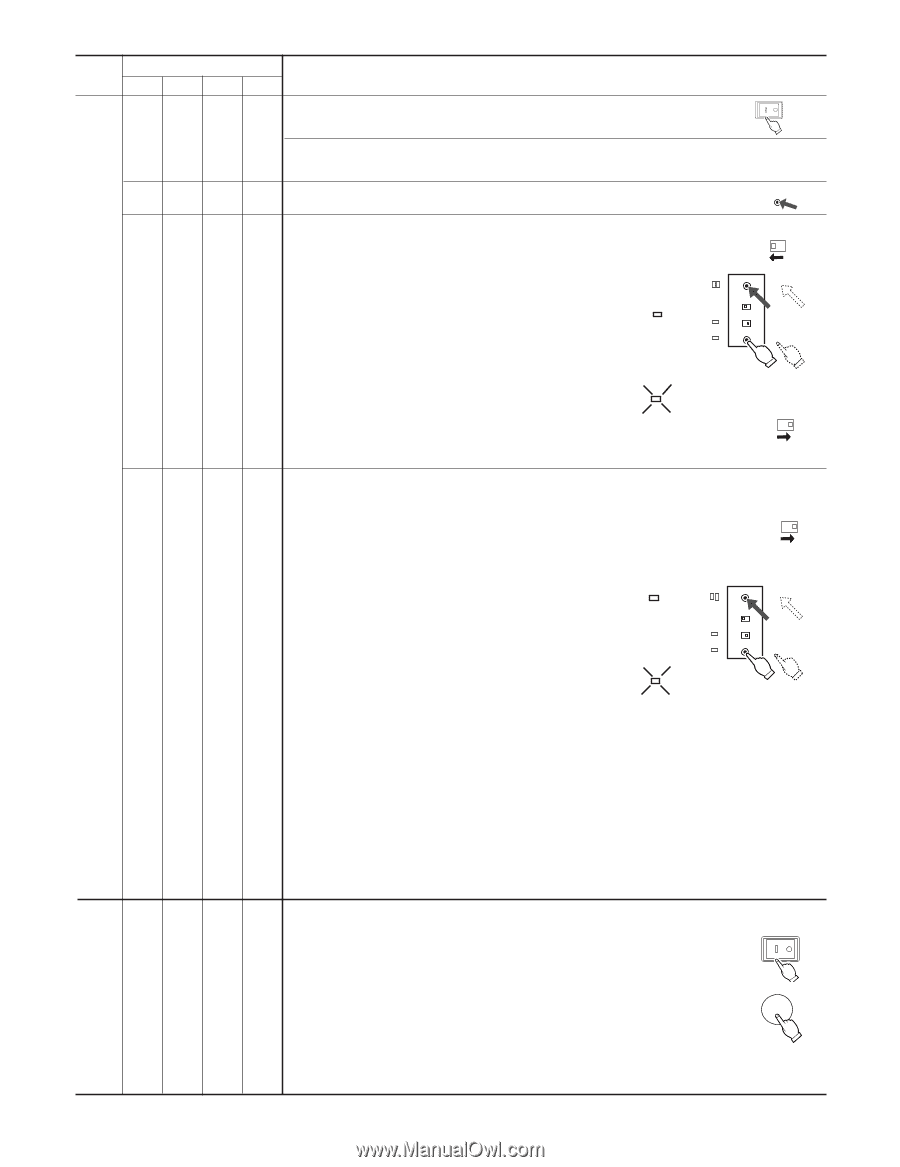
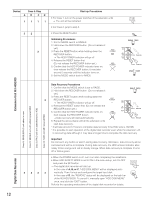
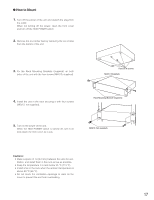
Device Case & Step A B CD 1 11 1 22 2 Start-up Procedures • For Case 1, turn on the power switches of the extension units . → The unit will be restarted. • For Case 2, jump to step 2. • Press the RESET button. Initializing Procedures 1. Set the MODE switch to SINGLE. 2. Hold down the RECOVER button. (Do not release it yet.) 3. Press the RESET button while holding down the RECOVER button. → The HDD POWER indicator will go off. 4. Release the RESET button first. (Do not release the RECOVER button yet.) 5. Confirm that the HDD POWER indicator turns on, then release the RECOVER button. It may take around 5 seconds until the indicator turns on. 6. Set the MODE switch back to RAID5. HDD POWER HDD POWER POWER RESET SINGLE RAID5 ERROR RESET HDD POWER OPERATE MODE SINGLE RAID5 HDD POWER OFF ON RECOVER 3 Press 4 Release 25 Press Release O SINGLE RAID5 Extension Unit WJ-HDE300 Case A: SINGLE/RAID unit added or new Case B: SINGLE unit with added/replaced HDD Case C: RAID unit with added/removed HDD Case D: RAID unit with replaced HDD Data Recovery Procedures 1. Confirm that the MODE switch is set to RAID5. 2. Hold down the RECOVER button. (Do not release it SINGLE RAID5 yet.) 3. Press the RESET button while holding down the 2 RECOVER button. → The HDD POWER indicator will go off. HDD POWER ERROR RESET MODE 4. Release the RESET button first. (Do not release the RECOVER button yet.) HDD POWER SINGLE RAID5 3 HDD POWER OFF ON Press 4 Release 5. Confirm that the HDD POWER indicator turns on, then release the RECOVER button. HDD POWER OPERATE RECOVER 25 → Data recovery will start automatically. Press Release 6. Repeat the above steps until all the extension units start data recovery. * It will take around 12 hours to complete data recovery if the HDD size is 160 GB. * It is possible to start operation of the digital disk recorder even while the extension unit is recovering data although it may take a longer time to complete the data recovery. Important Do not touch any button or switch during data recovery. Otherwise, data recovery will be canceled and will be incomplete. During data recovery, the HDD access indicator alternately blinks orange and red or steady orange. When data recovery is complete it turns off or blinks green. • When the POWER switch is off, turn it on after completing the installation. • When HDD SAFETY MODE is set to ON in the menu setup, set it to OFF and press the SET button. → The digital disk recorder will start up. POWER In the case of A, B, or C, "HDD DISK MENU" will be displayed auto- 3 33 3 matically. Then, format and configure the target hard disk. SET In the case of D, the "REMOVE" status will be displayed on the task bar of the WJ-HD316/309. To cancel it, manually open "HDD DISK MENU" once, and click the "EXIT" button. Refer to the operating instructions of the digital disk recorder for details. Digital Disk Recorder 12
-
 1
1 -
2
-
3
-
4
-
5
-
6
-
 7
7 -
 8
8 -
 9
9 -
 10
10 -
 11
11 -
 12
12 -
 13
13 -
 14
14 -
 15
15 -
 16
16 -
 17
17 -
18
-
19
-
20
 |
 |