Pfaff 1245 Owner's Manual - Page 9
Threading, needle, Enfilage, I'aiguille, Oberfaden, einfädeln, Enhebrado, superior
 |
View all Pfaff 1245 manuals
Add to My Manuals
Save this manual to your list of manuals |
Page 9 highlights
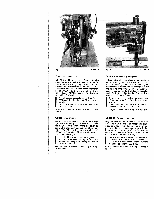
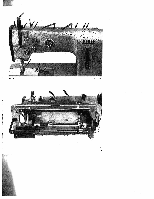
Fig. 7a Oberfaden einfädeln Den von der Garnrolle kommenden Faden durch die Vorspannung 1, (Fig. 7a), fädeln, danach wie in Fig. 7 gezeigt durch die Füh rung2,indieSpannung3,von rechtszwischen die Spannungsscheiben 4, um die Faden fuhrungsscheibe 5, uber die Fadenanzugsfe der 6 fOhren und in den Haken 7 einhangen. Von hier durch den Bugel 8, von rechts durch die Bohrung des Fadenhebels 9, durch die Bugel 8 und 10, durch die Sohrung 11 der Nadeistange führen und von links nach rechts die Nadel einfädeln. Das Fadenende etwa 5-6 cm durchziehen. Je nach Beschaffenheit des Fadens kann von dem Einfadel-Beispiel der Vorspannung abgewichen werden.) Threading the needle Pull the thread from the reel and lead it through thread retainer 1 (Fig. 7a), then - as shown in Fig. 7 - through guide 2, thread retainer 3, clockwise around and between tension discs 4, around thread controller disc 5, through thread check spring 6 and into hook 7. From there lead the thread through guide 8, from the right through the hole in take-up lever 9, down and through thread guides 8 and 10, and through hole 11 of the needle bar. Then thread the needle from left to right and pull about 2 inches of thread through the needle eye. (Depending on the properties of the thread it may be necessary to deviate from the above instructions for thread ing the upper thread retainer.> Enfilage de I'aiguille Faire passer le fil, provenant de a bobine, par a pretension 1 (fig. 7a), par le guide-fil 2, Ia tension 3, de a droite entre les disques de tension 4, autour des disques 5, par le ressort contrOleur 6 et l'accrocher dans le crochet 7 (fig. 7). Conduire ensuite le fil a travers I'étrier 8, de ladroite dans le levier releveur9, dans es étriers 8 et 10, dans le trou 11 dans a barre a aiguille et enfiler laiguille de Ia gauche. Tirer le fil sur environ 5 ou 6cm a traverse chas de laiguille. (Selon es propriétés du fil utilisé, l'enfilage de Ia pretension 1 peut différer des instructions ci-dessus.) Enhebrado del hNo superior Enhebre el hilo superior desde el carrete por el tensahilos previo 1 (fig. 7a) y a continuación, como se indica en Ia fig. 7, pase el hilo por el guiahilos 2 en el tensahilos 3, desde Ia de recha por entre los platillos del tensahilos 4, alrededor del platillo guiahilos 5. por encima del muelle recuperador 6 hasta engancharlo en el ganchito 7. Desde aqul condizcalo por el estribo 8, desde a derecha por el agujero de l paianca tirahilos 9, por los estrIbos 8 y 10, por el agujero 11 de Ia barra de aguja, y por el 010 de Ia aguja de izquierda a derecha. Deje un cabo de hilo de unos 5 a 6cm. (SegOn Ia estructura del hilo, eI enhebrado de Ia tensiOn previa puede ser diferente del in dicado). 9
-
 1
1 -
2
-
3
-
 4
4 -
 5
5 -
 6
6 -
 7
7 -
 8
8 -
 9
9 -
 10
10 -
 11
11 -
 12
12 -
 13
13 -
 14
14 -
15
-
16
-
17
-
18
-
19
-
20
-
21
-
22
-
23
-
24
-
25
-
26
 |
 |
