Pfaff admire air 5000 Manual - Page 19
Using a Standard Thread
 |
View all Pfaff admire air 5000 manuals
Add to My Manuals
Save this manual to your list of manuals |
Page 19 highlights
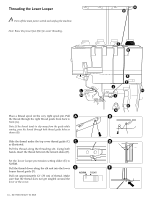
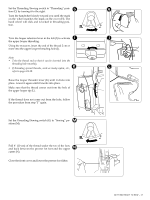
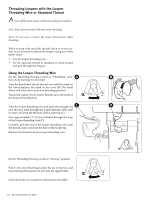
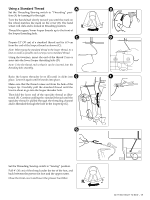
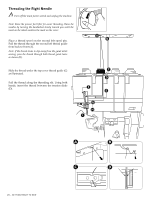
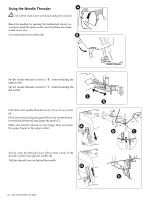
Using a Standard Thread A B Set the Threading/Sewing switch to "Threading" posi- tion (A) by turning it to the right. Turn the handwheel slowly toward you until the mark on the wheel matches the mark on the cover (B). The hand wheel will click and is locked in threading position. Thread the upper/lower looper threads up to the front of the looper threading hole. C D Prepare 12˝ (30 cm) of a standard thread and tie it 5 cm from the end of the looper thread as shown (C). Note: When tying the standard thread to the looper thread, tie a knot as small as possible and cut any excess standard thread. Using the tweezers, insert the end of the thread 2 cm or more into the lower looper threading hole (D). Note: Trim the thread end so that it can be inserted into the threading hole smoothly. Raise the looper threader lever (E) until it clicks into E F place. Lower it again until it knocks into place. Make sure that the thread comes out from the hole of the looper tip. Carefully pull the standard thread until the knot is about to go into the looper threader hole. Then fold the loose end of the specialty thread as illustrated (F). Continue pulling the standard thread until the specialty thread is pulled through the threading channel and is threaded through the hole in the looper tip (G). G Set the Threading/Sewing switch to "Sewing" position. Pull 4˝ (10 cm) of the thread under the toe of the foot, and back between the presser fot foot and the upper cutter. Close the front cover and lower the presser foot lifter. GETTING READY TO SEW - 19
-
 1
1 -
2
-
3
-
4
-
5
-
6
-
7
-
8
-
9
-
10
-
11
-
12
-
13
-
 14
14 -
 15
15 -
 16
16 -
 17
17 -
 18
18 -
 19
19 -
 20
20 -
 21
21 -
 22
22 -
 23
23 -
 24
24 -
25
-
26
-
27
-
28
-
29
-
30
-
31
-
32
-
33
-
34
-
35
-
36
-
37
-
38
-
39
-
40
-
41
-
42
-
43
-
44
 |
 |
