Pfaff admire air 5000 Manual - Page 28
Sewing
 |
View all Pfaff admire air 5000 manuals
Add to My Manuals
Save this manual to your list of manuals |
Page 28 highlights
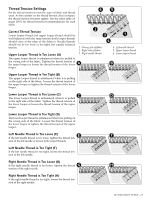
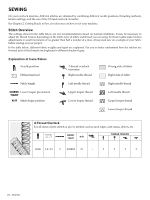
SEWING On your overlock machine, different stitches are obtained by combining different needle positions, threading methods, tension settings, and the use of the 2-thread overlock converter. See Chapter 2, Getting Ready to Sew, for references on how to set your machine. Stitch Overview The settings shown in the table below are our recommendations based on normal conditions. It may be necessary to adjust the thread tension depending on the stitch, type of fabric and thread you are using. For best results make tension adjustments in small increments of no greater than half a number at a time. Always test sew on a sample of your fabric before sewing on your project. In the table below, different fabric weights and types are explained. For you to better understand how the stitches are formed, each of the threads are displayed in different shades of grey. Explanation of Icons/Colors Needle position Differential feed 2-thread overlock converter Right needle thread Wrong side of fabric Right side of fabric Stitch length Left needle thread Right needle thread NORM/ Lower looper pre-tension TIGHT N/R Stitch finger position Upper looper thread Lower looper thread Left needle thread Upper looper thread Lower looper thread 4-Thread Overlock For all seams where stretch or give is needed, such as neck edges, side seams, sleeves, etc. NORM/ TIGHT N/R THREAD TENSION Both 1.0~1.5 3 NORM N - 3 3 3 3 28 - SEWING
-
 1
1 -
2
-
3
-
4
-
5
-
6
-
7
-
8
-
9
-
10
-
11
-
12
-
13
-
14
-
15
-
16
-
17
-
18
-
19
-
20
-
21
-
22
-
 23
23 -
 24
24 -
 25
25 -
 26
26 -
 27
27 -
 28
28 -
 29
29 -
 30
30 -
 31
31 -
 32
32 -
 33
33 -
34
-
35
-
36
-
37
-
38
-
39
-
40
-
41
-
42
-
43
-
44
 |
 |
