Pfaff ambition 620 Manual - Page 45
Select a Stitch, Stitch Adjustments, Stitch Width/Stitch Positioning
 |
View all Pfaff ambition 620 manuals
Add to My Manuals
Save this manual to your list of manuals |
Page 45 highlights
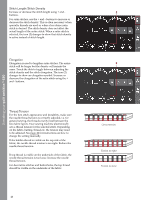
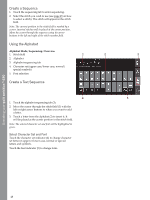
Operating your quilt ambition™ 630 Select a Stitch Touch the up or down arrow buttons (7 and 9) on either side of the selected stitch number to step between stitches. Touch the selected stitch number (8) to open the stitch selection menu. To find the stitch you want to use; touch the desired stitch category button then use the up or down arrows until you find the desired stitch. Touch the stitch to select it. Touch the red X button to close the stitch selection menu without making any changes. Stitch Adjustments Your machine will automatically select optimal settings for each stitch. You can make adjustments to every stitch as desired. Adjusted settings only affect the selected stitch and will be reset to default when another stitch is selected. Adjusted settings are not automatically saved when the machine is turned off. The values for stitch length and stitch width are shown in the lower part of the graphic display. Use the + and buttons to make adjustments. When a setting is changed the numbers will be highlighted in green. When trying to exceed minimum or maximum settings for width and length, a warning sound will be heard. 1. Thread tension 2. Stitch width/stitch positioning Stitch Width/Stitch Positioning Increase or decrease the stitch width using + and buttons. For straight stitches, use + and - to move the stitch position left or right. When a straight stitch is selected, the icon changes to show that stitch positioning is active instead of stitch width. 3. Stitch length/stitch density/elongation 45
-
 1
1 -
2
-
3
-
4
-
5
-
6
-
7
-
8
-
9
-
10
-
11
-
12
-
13
-
14
-
15
-
16
-
17
-
18
-
19
-
20
-
21
-
22
-
23
-
24
-
25
-
26
-
27
-
28
-
29
-
30
-
31
-
32
-
33
-
34
-
35
-
36
-
37
-
38
-
39
-
 40
40 -
 41
41 -
 42
42 -
 43
43 -
 44
44 -
 45
45 -
 46
46 -
 47
47 -
 48
48 -
 49
49 -
 50
50 -
51
-
52
-
53
-
54
-
55
-
56
-
57
-
58
-
59
-
60
-
61
-
62
-
63
-
64
-
65
-
66
-
67
-
68
 |
 |
